Duplicates
A photo library with multiple copies of the same file can quickly become overwhelming. Tonfotos simplifies your cataloging experience by automating the process of identifying and removing duplicates. It focuses on finding and deleting exact duplicates—that is, files with identical binary image contents—while preserving any versions you've edited or tagged. If you're looking to locate visually similar images instead, check out our blog post with an overview of tools that specialize in that task.
Tonfotos not only helps you clean up your current library by removing duplicates but also offers features to prevent re-importing duplicate files when adding new photos. This ensures your library stays organized and efficient over time.
What is considered a duplicate in Tonfotos
Tonfotos is dedicated to automating duplicate search and removal. That's why it detects as duplicates only the exact copies of the same file.
Let's consider some of the situations you may meet with:
| What are these image files | Will Tonfotos detect them as duplicates? | Explanation |
|---|---|---|
| Exact copies that are located in different folders. |  | The contents of these files are exactly the same, so Tonfotos will detect them as duplicates. |
| One of the exact copies was renamed without editing any of the contents. | | Changing the filename doesn't change the contents, so Tonfotos will detect them as duplicates. |
| A RAW photo and the copy that was made from it to prepare for publication. |  | Preparing the photo for publication includes converting the photo to a different format. Its contents will change. |
| The same photo in different formats, for example, TIFF and PNG. | | The contents of the same image in different formats differ, and choosing one to delete automatically is not possible. |
| An original photo and a corrected and edited version. | | Applying filters, cropping the photo, or any other edits make the edited photo different, and only you can decide which edits you want to keep. |
| The photos are from a series of shots taken in the same spot. | | At first glance, you might think they are the same photo, but there will be subtle differences. It's up to you to choose the best. |
| One of the photos had its metadata edited or tags added. | | This is a non-obvious case where the photos will look the same, but will still be considered different. If Tonfotos automatically removed a duplicate to which you added tags or corrected the location and date, your work on organizing would have been lost. |
Removing duplicates from the entire library
The Remove duplicates... feature lets you review and clean up duplicates across the whole library. It groups duplicates by folders so that you can quickly decide which locations should keep the originals and where it is safe to delete copies.
To remove duplicates across locations:
- Select File > Remove duplicates....
- The Delete Duplicates dialog opens and starts Calculating... duplicate statistics for your library.
- If no duplicates are found, Tonfotos displays the No duplicates detected. message. You can then close the dialog by clicking Done.
- If duplicates exist, they are grouped by folders and shown in the navigation panel on the left and the details pane on the right.
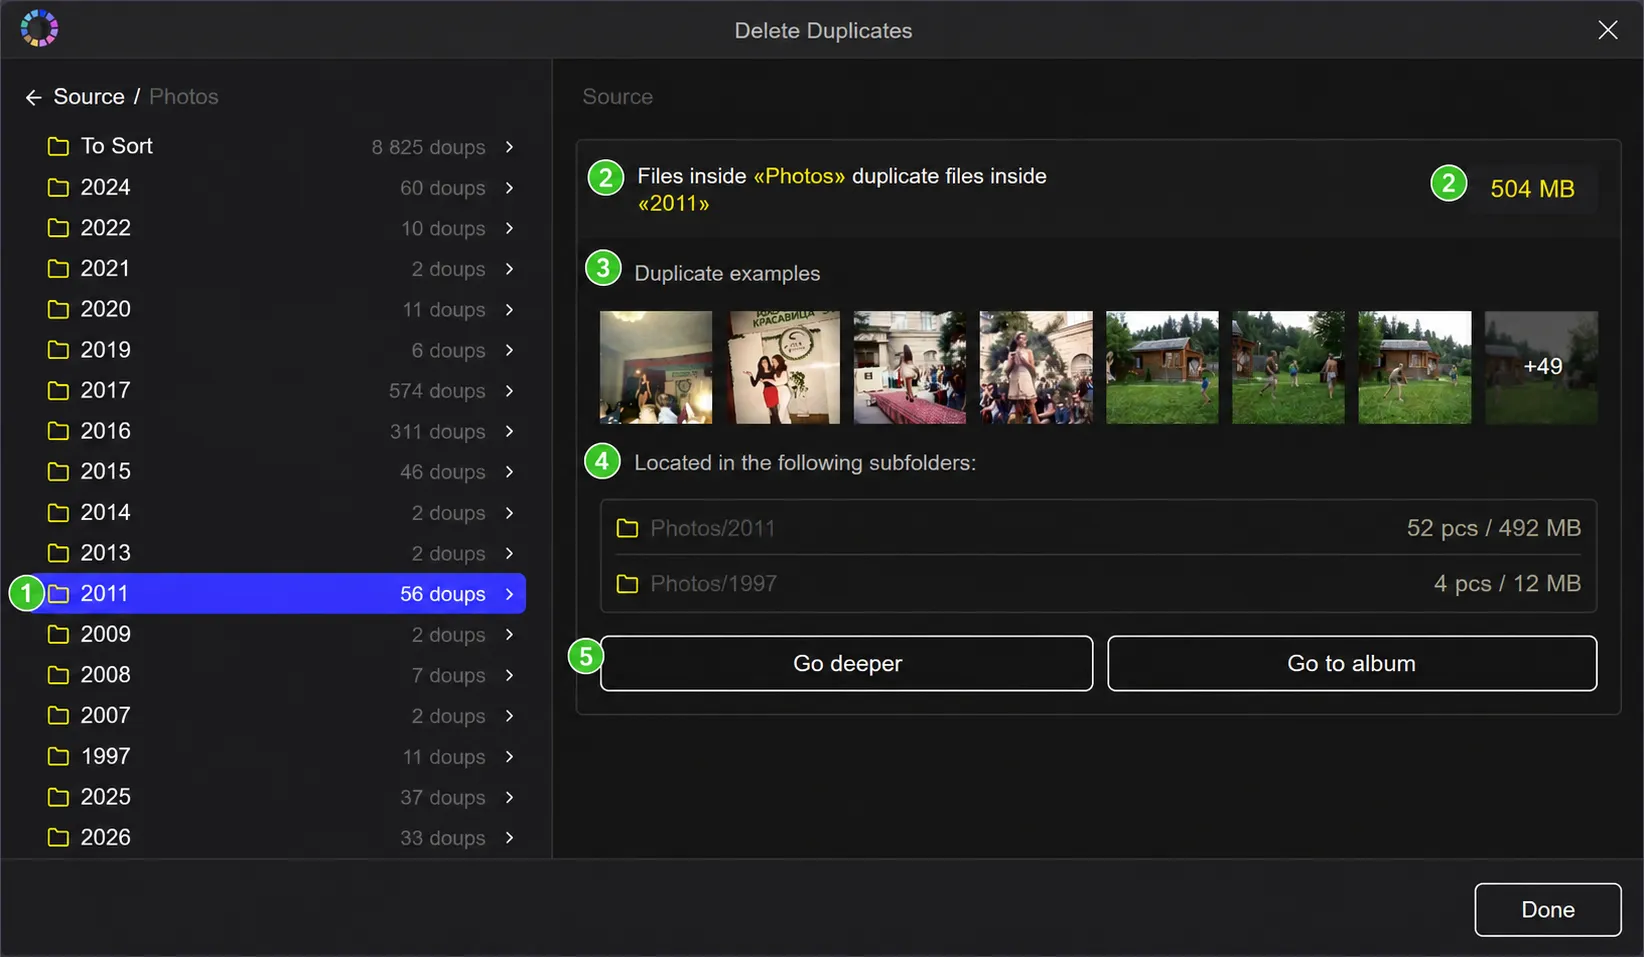
Use the navigation panel on the left to choose which folder to clean up.
- The panel lists all folders that contain duplicate files. For each folder, you can see the total number of duplicate files in that folder and its subfolders, followed by the label doups 1.
- If duplicates are also present in subfolders, an arrow button appears next to the folder name. Click this arrow to go deeper into the folder tree and see duplicates only inside a specific part of your library.
- At the top of the panel, the breadcrumb trail starts with Source and shows where in the library tree you currently are.
- To move back up the folder tree, use the breadcrumb trail controls: click the back arrow to go up one level, or click any folder name in the trail to jump directly to that level. The same type of breadcrumb navigation is available above the details pane on the right.
When you select a folder on the left, the details pane on the right shows all duplicate sets for that folder 2.
- At the top of each card, the description line explains where duplicates were found.
- On the right side of the header, a badge shows the total size of duplicate files in this pair of folders.
- Cards are sorted by the total size of duplicate files in each folder pair, from largest to smallest, so that the biggest opportunities to free up space appear first.
Below the header, the card contains:
- Duplicate examples 3 — a strip of example thumbnails taken from this duplicate set. Click any thumbnail to close the dialog and go to that file in the main window. If there are more duplicates than can fit into the strip, the last thumbnail shows a "+N" overlay. Clicking this overlay closes the dialog and opens all files from this duplicate group in the Duplicates album for detailed review.
- Located in the following subfolders: 4 — a list of subfolders where duplicates were found.
For each subfolder, you can see:- its path,
- the number of duplicate files (in pcs),
- and the total size of these duplicates. If duplicate files are located in the listed folder, and not just in its subfolders, its path is clickable: click it to close the dialog and open this folder directly in Tonfotos.
At the bottom of the card, you can choose how to handle this group of duplicates 5:
- Go deeper — narrows the view down to the selected subfolder and shows duplicates only inside it. Use this when you want to work with a smaller part of a large folder tree or check each subfolder individually.
- Delete in folder name — deletes all duplicate copies in the specified folder while keeping identical copies in the other folder.
Typically, you will use this to delete duplicates from temporary or import folders and keep the copies in your principal library location. - Go to album — appears when Tonfotos cannot automatically determine which copies should be deleted safely (for example, when your selection is too broad and contains all existing copies of some files). Click this button to close the dialog and open all files from this duplicate group in the Duplicates album. There you can manually decide which copies to keep and which to remove.
When you are finished cleaning up duplicates, click Done or press
Escto close the Delete Duplicates dialog.
The Duplicates album
In the Delete Duplicates dialog, some duplicate groups cannot be safely cleaned up automatically. In these cases, you will see the Go to album button at the bottom of the group card or a "+N" overlay on the last thumbnail in the Duplicate examples strip.
Click Go to album or the "+N" overlay to close the dialog and automatically generate the Duplicates album for this group of duplicates.
The Duplicates album shows all files that belong to the selected duplicate group. Review them and delete the copies you do not need, making sure that at least one copy of each photo is kept.
Review the Duplicates album and remove the copies you don't need. When only one photo remains, it is no longer shown in this album. If you remove all duplicates, the album will be empty.
Removing copies of the selected files
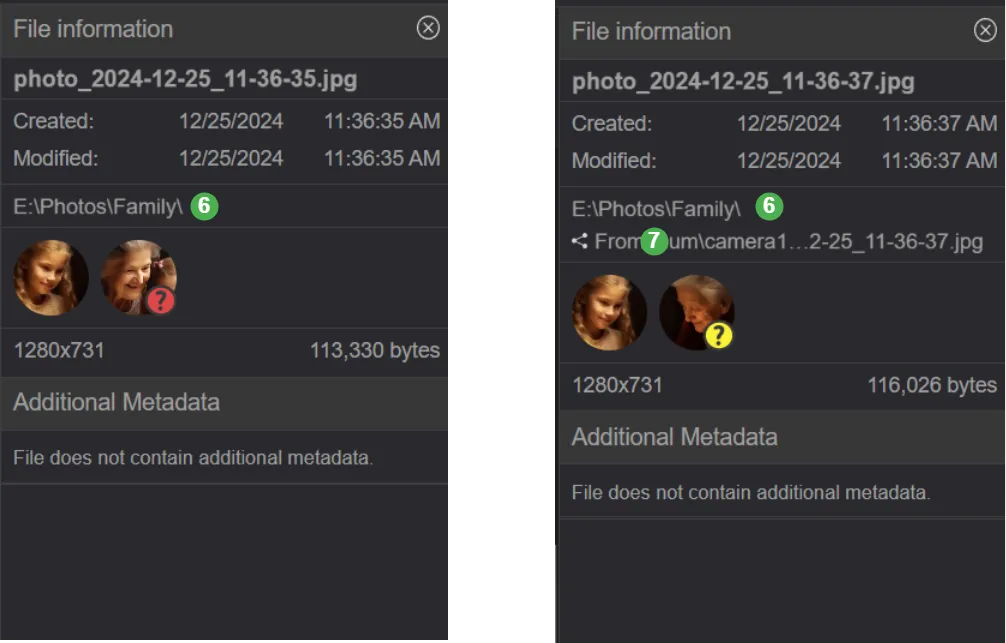
Once your library is indexed, the File information pane shows you all duplicates of a selected photo, which lets you go to the other copies and select which copy to keep and which to delete. This is the best method for fine control over duplicate removal, and you can apply it to multiple files at the same time.
- Press CtrlP, or CmdP on macOS, or click
 in the upper right to show the File information pane.
 - Under the filename and dates of creation and modification, you can see the full path to the photo 6. If it has duplicates, you can also see clickable paths to all the duplicates 7: click on a path to go to the location of that copy.
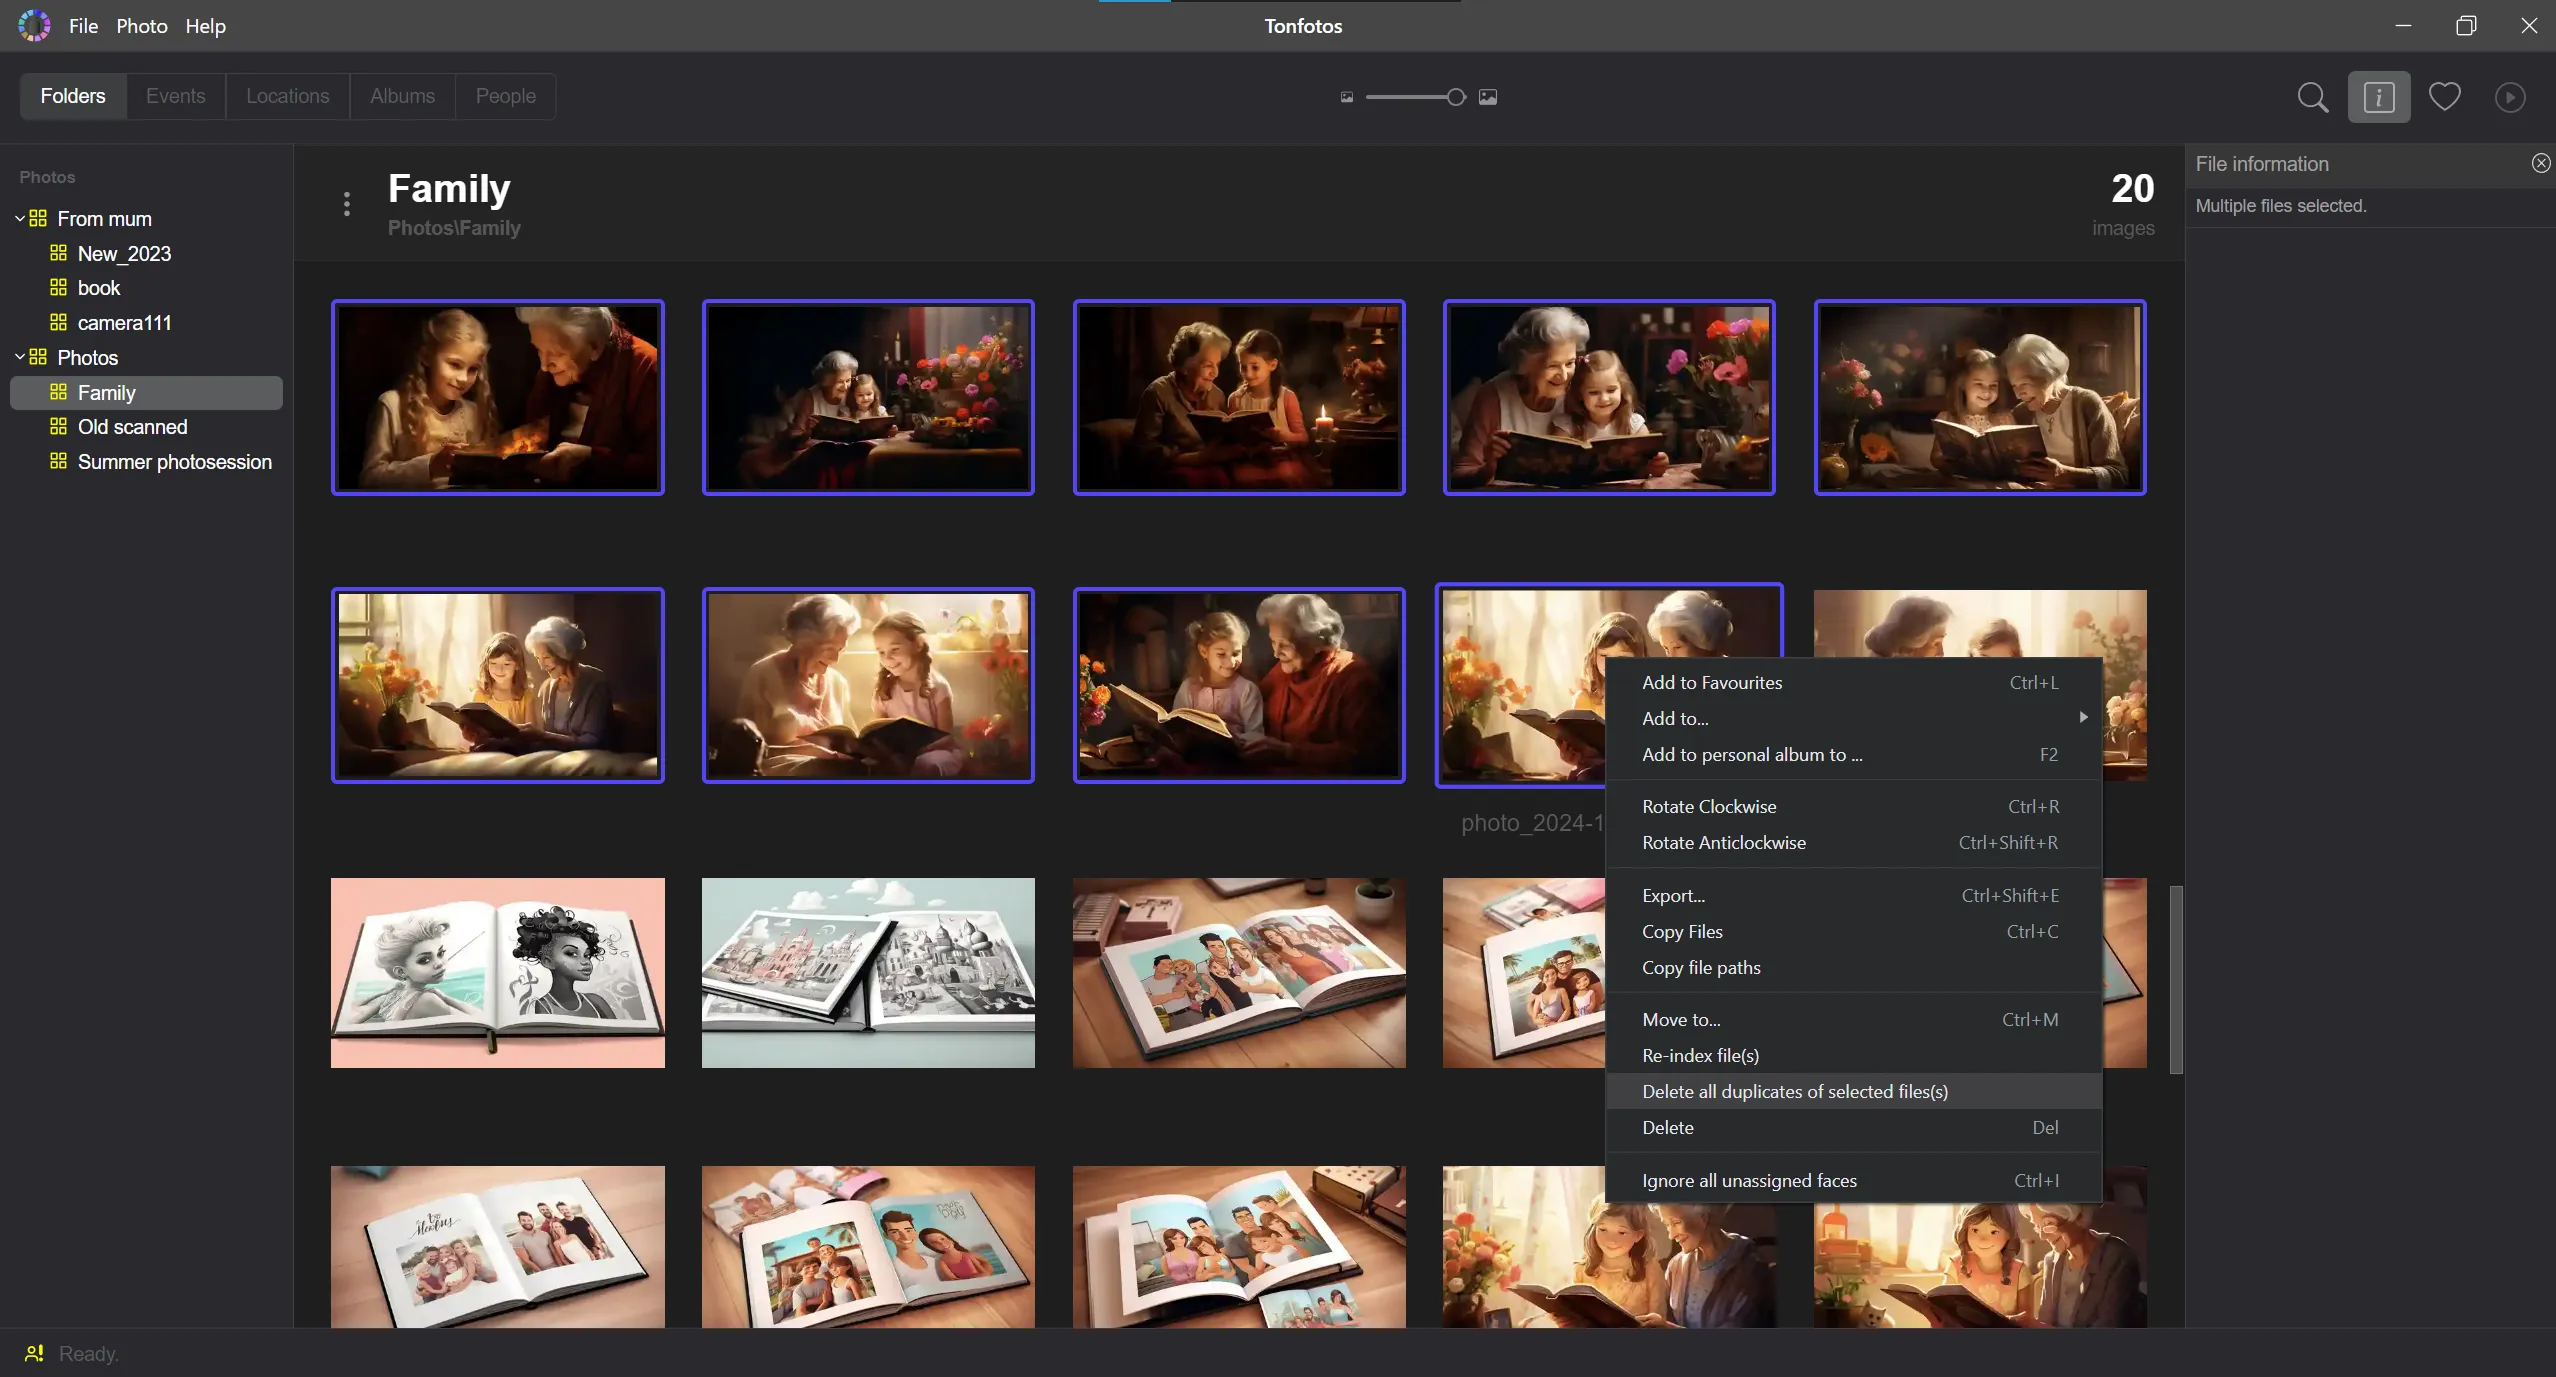
- When you decide which copy to keep, right-click it and select Delete all duplicates of selected file(s) to remove all other copies. Do the same for several files to remove all extra copies of all selected files.
Preventing duplicate import
After tidying up your photo library, all that remains is to make sure that the new photos you add don't contain any more duplicates.
To avoid duplicates during import from your devices, check the Duplicates: Ignore checkbox.
Additionally, check the Ignore older than: checkbox and specify the date of your last import. This is particularly useful if you have edited photo metadata, as such changes make the files appear different. By setting a date filter, you can prevent re-importing these photos, keeping your library clean and free of unnecessary duplicates.
Move to main archive
You may already be using the Move to main Archive... feature to move your photos from a temporary folder into the principal library location and organize them into Year/Date formatted subfolders at the same time. This feature also prevents adding duplicates to your principal library: Tonfotos detects duplicates during the move and prompts you to delete the extra copies.