Best Image Annotation Tool
Updated: July 23, 2026 Author: Vitaly
In this article, I have gathered the best tools for annotating not only simple images, such as screenshots, but also photographs. With their help, you can create truly clear guides for your relatives or bring perfect order to your family photo archive in just a few minutes.
We live in an age of terabytes of visual content. Our smartphones and computer hard drives are packed with thousands of images. To make sense of this huge amount of data, all this visual information needs to be structured, explained, and processed in some way.
You have probably, like me, often had to explain something to older relatives. For example, how to change a computer setting or help set up home internet. Just last week, my grandmother called me in a panic again because her “Wi-Fi had disappeared” and an unfamiliar light was blinking on the router. Trying to explain verbally where to click and which browser tab to open took half an hour.
To avoid explaining everything in words, I make screenshots in such situations. However, screenshots by themselves are just images with minimal informational value for an elderly person. If you send a “bare” interface image, your relative may become even more confused.
The same applies to family photos that have been collected over the past 20 years and are now stored all together in a huge folder on the computer under faceless names like IMG_4839.jpg. Finding photos from your grandmother’s anniversary or from a cruise trip five years ago turns into an impossible task for an entire evening.
But what do creating a simple router setup instruction for older relatives and organizing a family photo archive have in common? All these tasks come down to the same process — image annotation. This means assigning meaningful labels, text descriptions, geometric marks, such as arrows and frames on a screenshot, or hidden metadata to images or to specific areas within them.
In the case of my grandmother and the router, it was enough to draw a thick red arrow over the screenshot pointing to the “Restart” button and add a large caption: “Click here.” The image immediately gained meaning.
In this detailed guide, I will review the best tools for image annotation, whether you are working with a screenshot or a photograph. I will explain the technical reasons why users partially or completely lose important markup data when moving images, and I will show how to fix this problem.
Home Photo Cataloging Systems
Among consumer image annotation tools, the hardest solution to choose is usually one for working with home photo libraries. The main technical problem here lies in the global incompatibility of formats and data-storage approaches. Each developer of this type of software tries to pull the blanket to their own side, invents proprietary markup algorithms, and intentionally locks users inside their ecosystem, making the data unreadable for competitors’ software.
Here is a simple real-life example. For years, I relied on Apple Photos to store photos and videos taken on my phone. My archive kept growing, and at some point the amount of space used in iCloud began rapidly approaching 2 TB. I had to choose: move to the next, more expensive plan or transfer everything to local storage. After thinking about the fact that 2 TB is far from the limit, that cloud storage needs will only grow over time, and that I did not want to pay for a subscription forever, I chose local storage.
Of course, I had built an excellent photo archive inside Apple Photos. All my relatives, friends, and acquaintances were marked there, an interactive map of visited places had been created, and touching “Memories” collections were generated automatically.
But I was genuinely surprised and disappointed when, after exporting the files to a local drive, I encountered that very technical incompatibility. The photos turned out to be completely “bare”! All markings of recognized faces, keywords, and even the titles I had changed disappeared. Dozens of hours of work spent annotating the archive simply vanished because Apple Photos stores all this data in its own closed database, not inside the photo files themselves.
By the way, Google Photos is slightly better in this regard. Face-recognition labels are not included during export, but at least comments and edited geotags are written into the files and remain after downloading.
This unpleasant and painful experience pushed me to look for a more universal, open, and cloud-independent tool.
Tonfotos
When we look at a photo taken on a phone or camera, we see only the captured moment. However, photographs are not only pixels that form an image, but also metadata, such as EXIF, IPTC, and XMP. This hidden information can sometimes tell more about a picture than the image itself. Most annotations that serve as the basis for later sorting and organization are stored there.
Tonfotos is a genuinely convenient photo manager that makes adding, editing, and organizing photo archives based on metadata annotations an intuitive process.
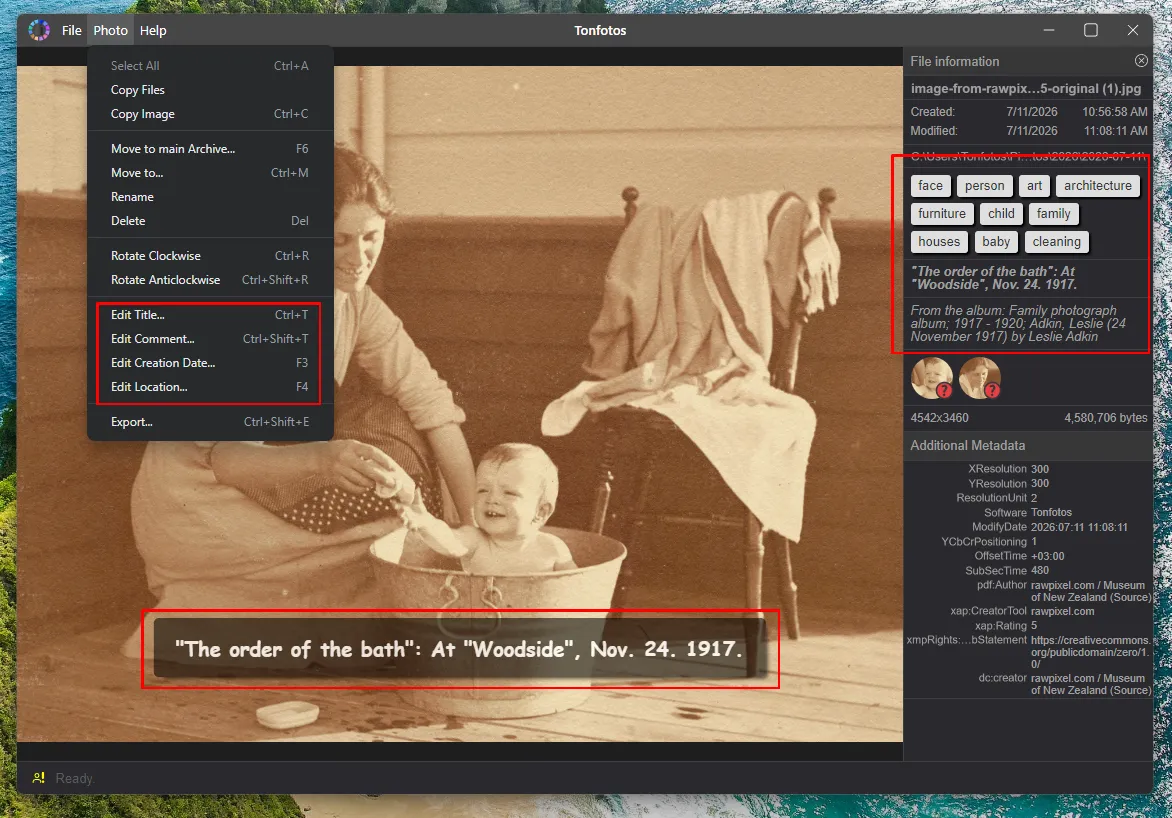
The main advantage of the program is that important annotations such as titles, comments, geolocation, tags, and the names of recognized people are written directly into the file. This is key information that can be read without issues by photo cataloging tools and photo editors on any operating system. If you decide to move your archive to another computer, your markup will not be lost.
However, Tonfotos is not limited to working only with basic data. The application includes a powerful people-management system. It does not simply display names and automatically group all photos of people recognized by the neural network; it also allows you to add detailed additional annotations. For example, you can specify a date of birth or death, workplace, contacts, and other biographical information.
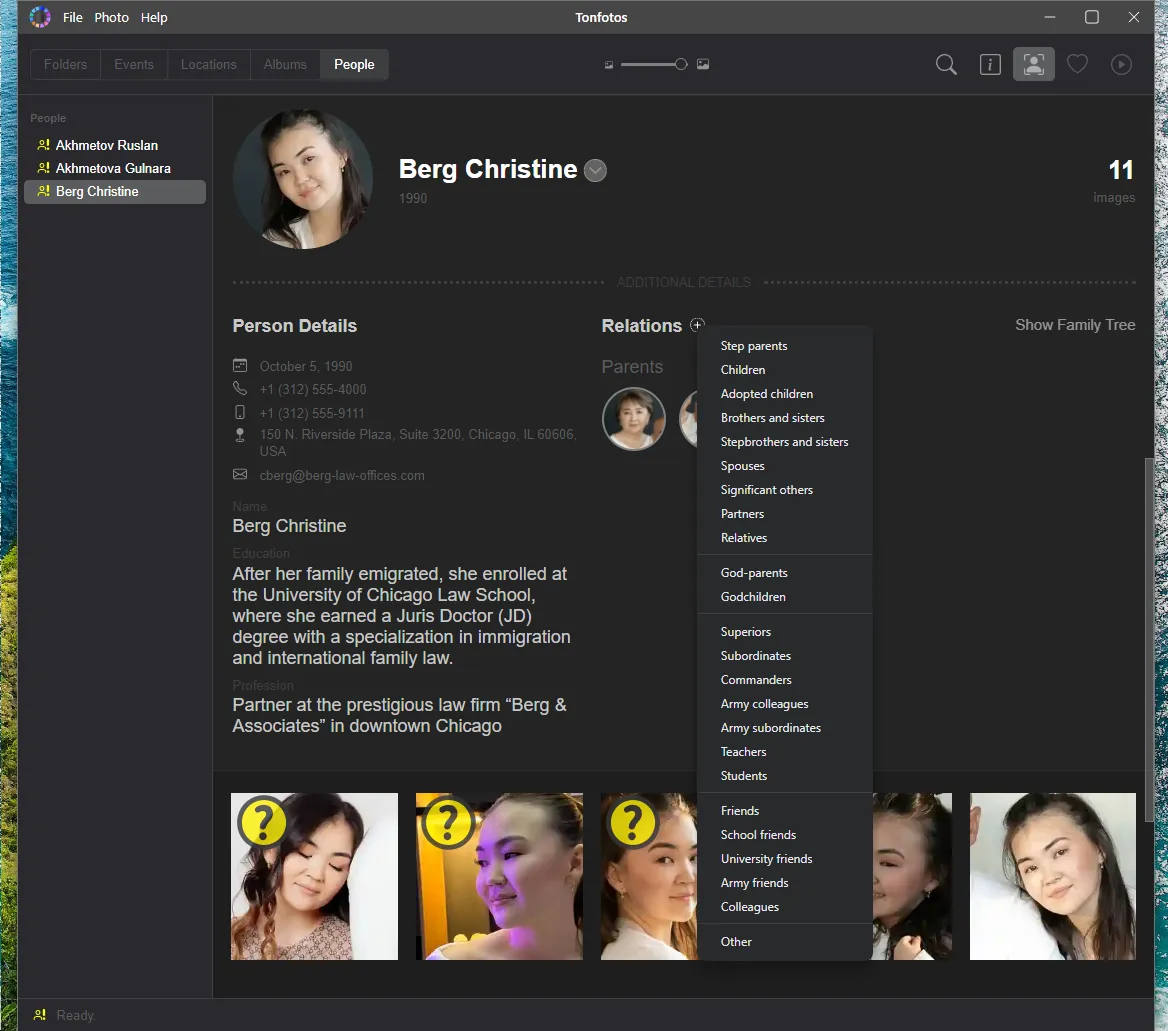
The relationships section is especially interesting, as it lets you clearly indicate how people are related to each other. For example, “Parent,” “Wife,” or “Cousin.”
Advantages of Tonfotos for Photo Annotation
Local storage and data privacy.
Writing annotations into metadata, making them independent of a specific program.
Smart automatic face recognition.
A unique system of family relationships and person cards.
Convenient work with maps and geotags.
A simple and clear interface.
Cross-platform support and support for different sources.
Disadvantages of Tonfotos for Photo Annotation
High system load during the first indexing process.
Limited photo-editing functionality.
No automatic contextual photo-tagging system.
Photo Supreme
Before finally settling on Tonfotos, I spent several weeks working with Photo Supreme to understand whether this program would be suitable for organizing my home photo archive. I personally tested this utility, and in practice it turned out to be more of a fast viewer with cataloging features.
Overall, this is a completely different class of software. While Tonfotos is designed primarily for ordinary users and family collections, Photo Supreme is closer to a professional DAM system intended for photographers, designers, and companies that need to manage tens or hundreds of thousands of images.
The interface is significantly more complex, and every action is accompanied by many settings. On the one hand, this opens up huge cataloging possibilities, but on the other hand, it requires time to learn. Organizing a photo archive turns from a pleasant journey through memories into a full-fledged workflow.
One of the reasons I decided to try Photo Supreme was its metadata support for photo annotations. The program supports all international standards: IPTC, XMP, and EXIF. Almost any information can be saved directly into the file, which automatically makes it available in other programs. However, the abundance of features that were unnecessary for my tasks reduces the value of this advantage.
Notably, by default the program uses a built-in local neural network for face recognition, but Google Vision AI can be connected if desired. This helps improve detection accuracy, but requires creating a project in Google Cloud, configuring the API, obtaining access keys, and paying for use of the cloud service. For a professional studio, this setup may be justified, but going through this process for several thousand family photos seemed unreasonable to me. Moreover, when used locally, it lacks full automatic tagging and built-in smart face recognition “out of the box” like some competitors offer.
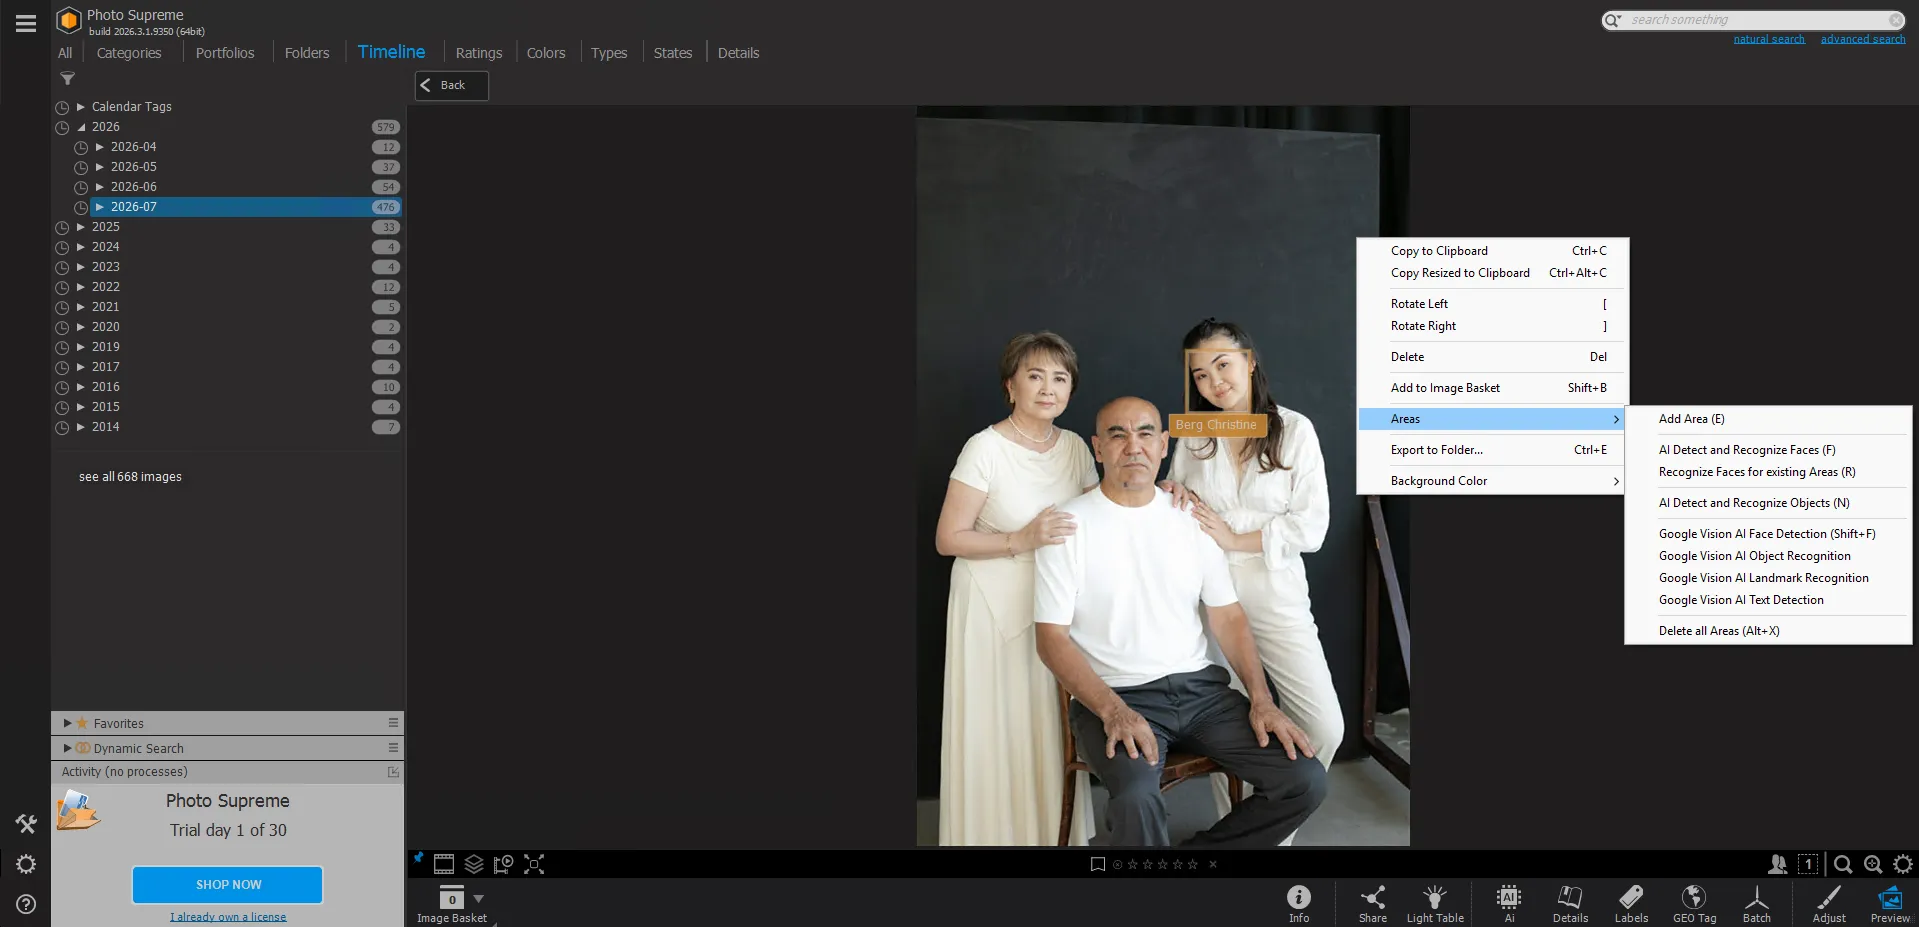
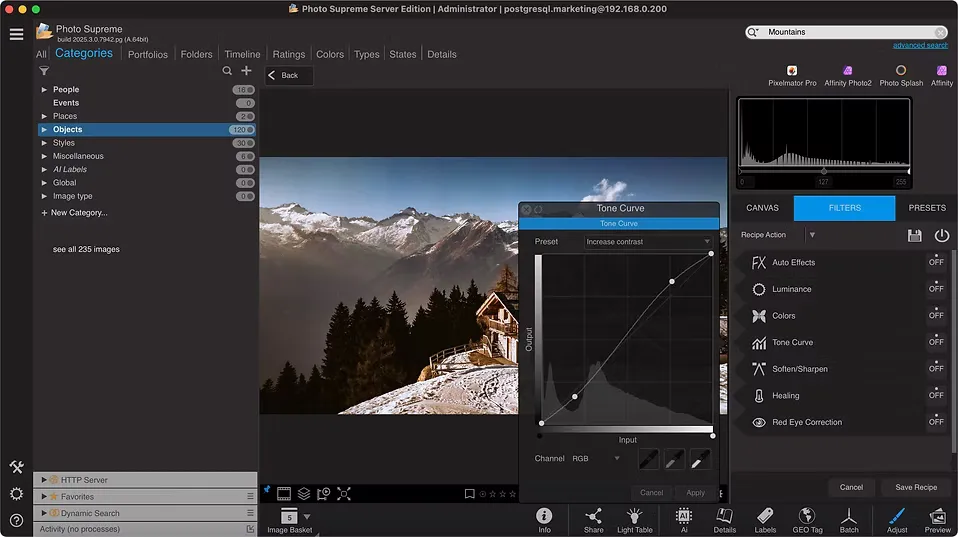
As a result, I quickly realized that I was using only a small part of the program’s capabilities. Features such as ratings and color labels are indeed convenient for selecting photos after a trip. But portfolio-creation tools, publishing features, photo-editing tools, and many other capabilities were hardly used in my case.
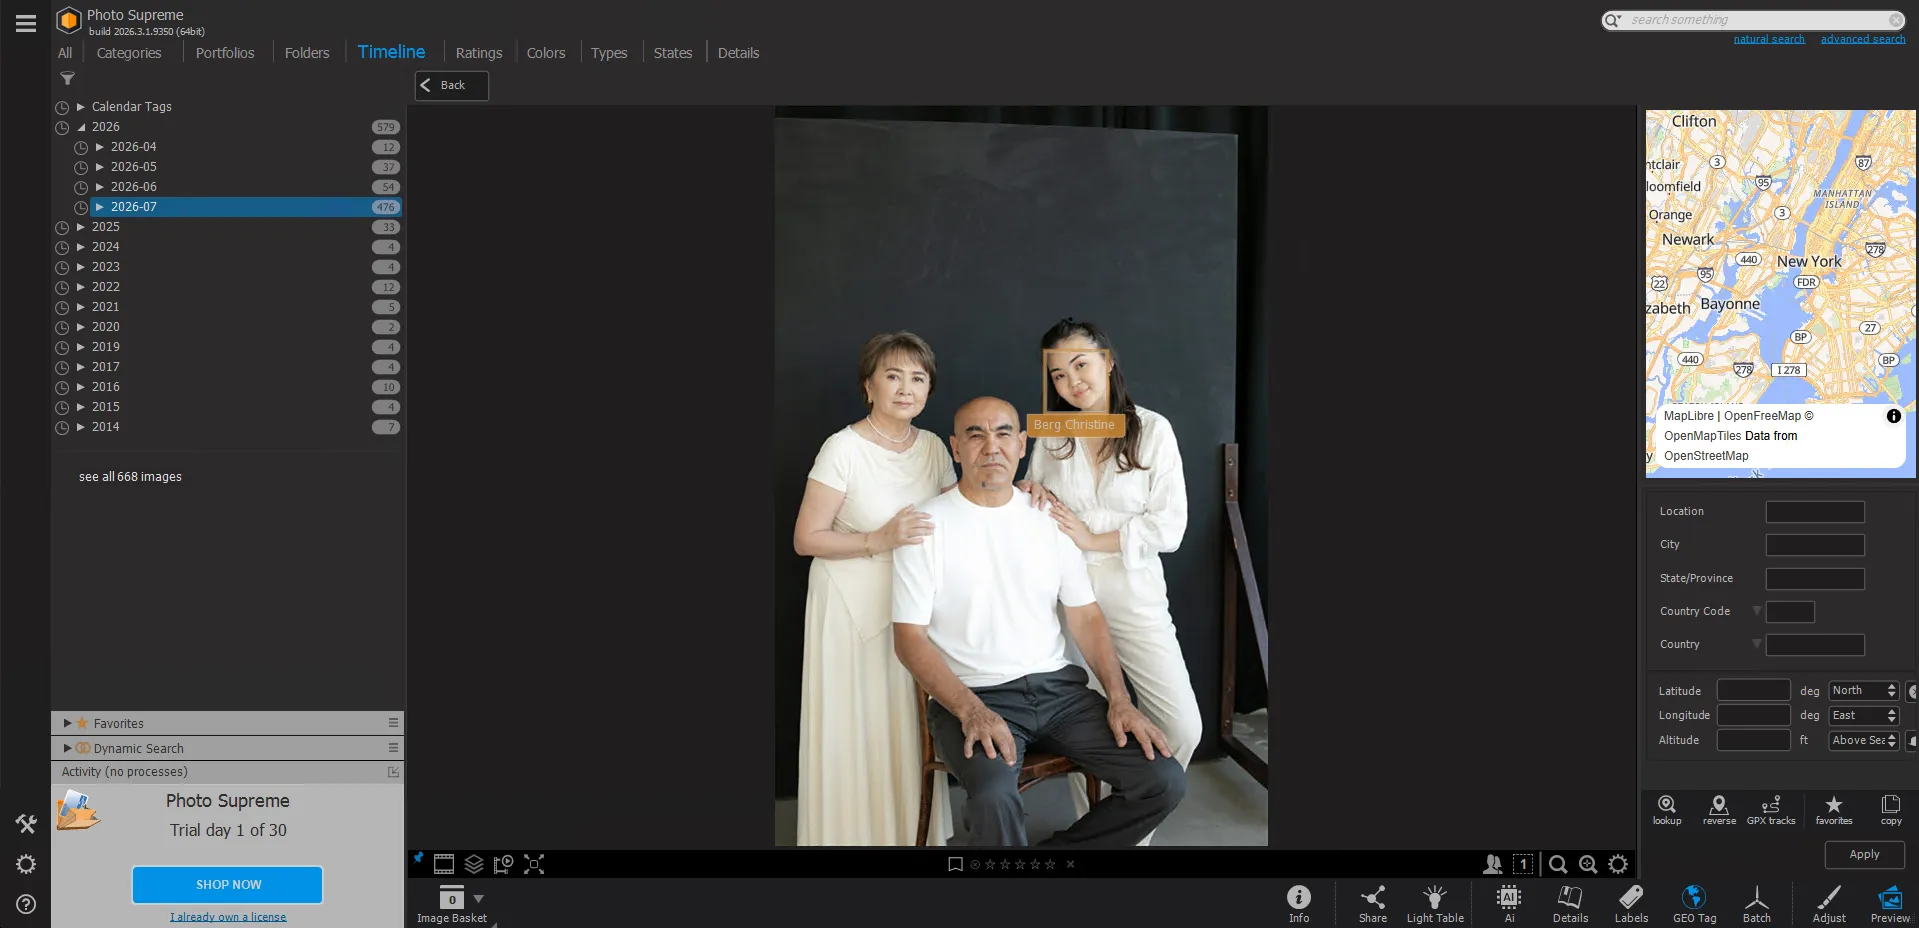
I noticed another issue when I tried to find photos taken in specific places. Tonfotos uses an interactive map where all shooting locations are immediately visible: you can zoom in on the required area and quickly open the corresponding photos. Several times, this helped me find pictures from different trips without any effort.
In Photo Supreme, geodata works differently. Location information is displayed only as a small mini-map when viewing a specific photo. This is enough for checking coordinates, but searching for photos by shooting location turned out to be inconvenient.
Advantages of Photo Supreme for Photo Annotation
Professional digital-asset management.
Full metadata support.
A developed system of ratings and color labels.
A flexible cataloging system.
Disadvantages of Photo Supreme for Photo Annotation
The interface is aimed at professionals.
Too many features for a family photo archive.
Less visual work with geolocation.
Time is required for initial setup.
digiKam
digiKam attracted me with its open-source philosophy. It is a completely free program with no ads, hidden subscriptions, or other limitations. At first glance, it may seem like the “Holy Grail” for organizing photos, but in practice things are a little different.
Like many non-commercial projects, digiKam suffers from usability issues. For an unprepared user, the program’s interface can look genuinely terrifying.
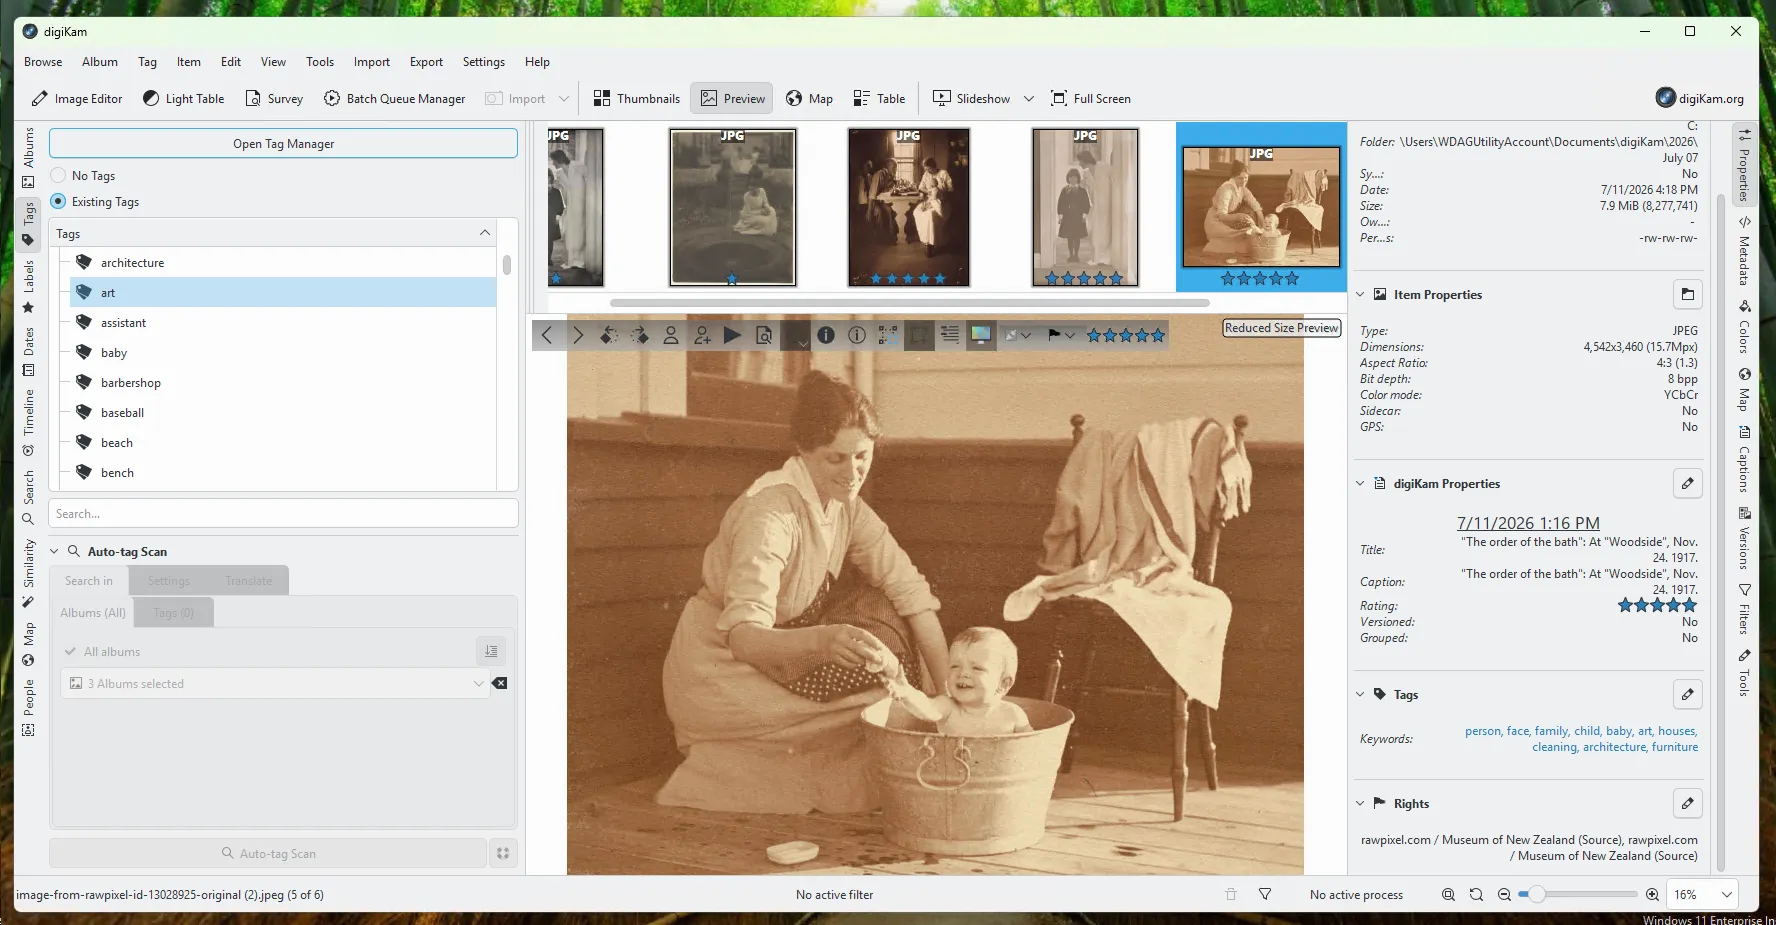
The first few days were difficult. To find the necessary feature, I had to wander through menus and settings, and I discovered some capabilities only after reading the documentation and having long conversations with an AI chat. It felt as if the developers first implemented the maximum number of features and only later thought about how users would actually use them.
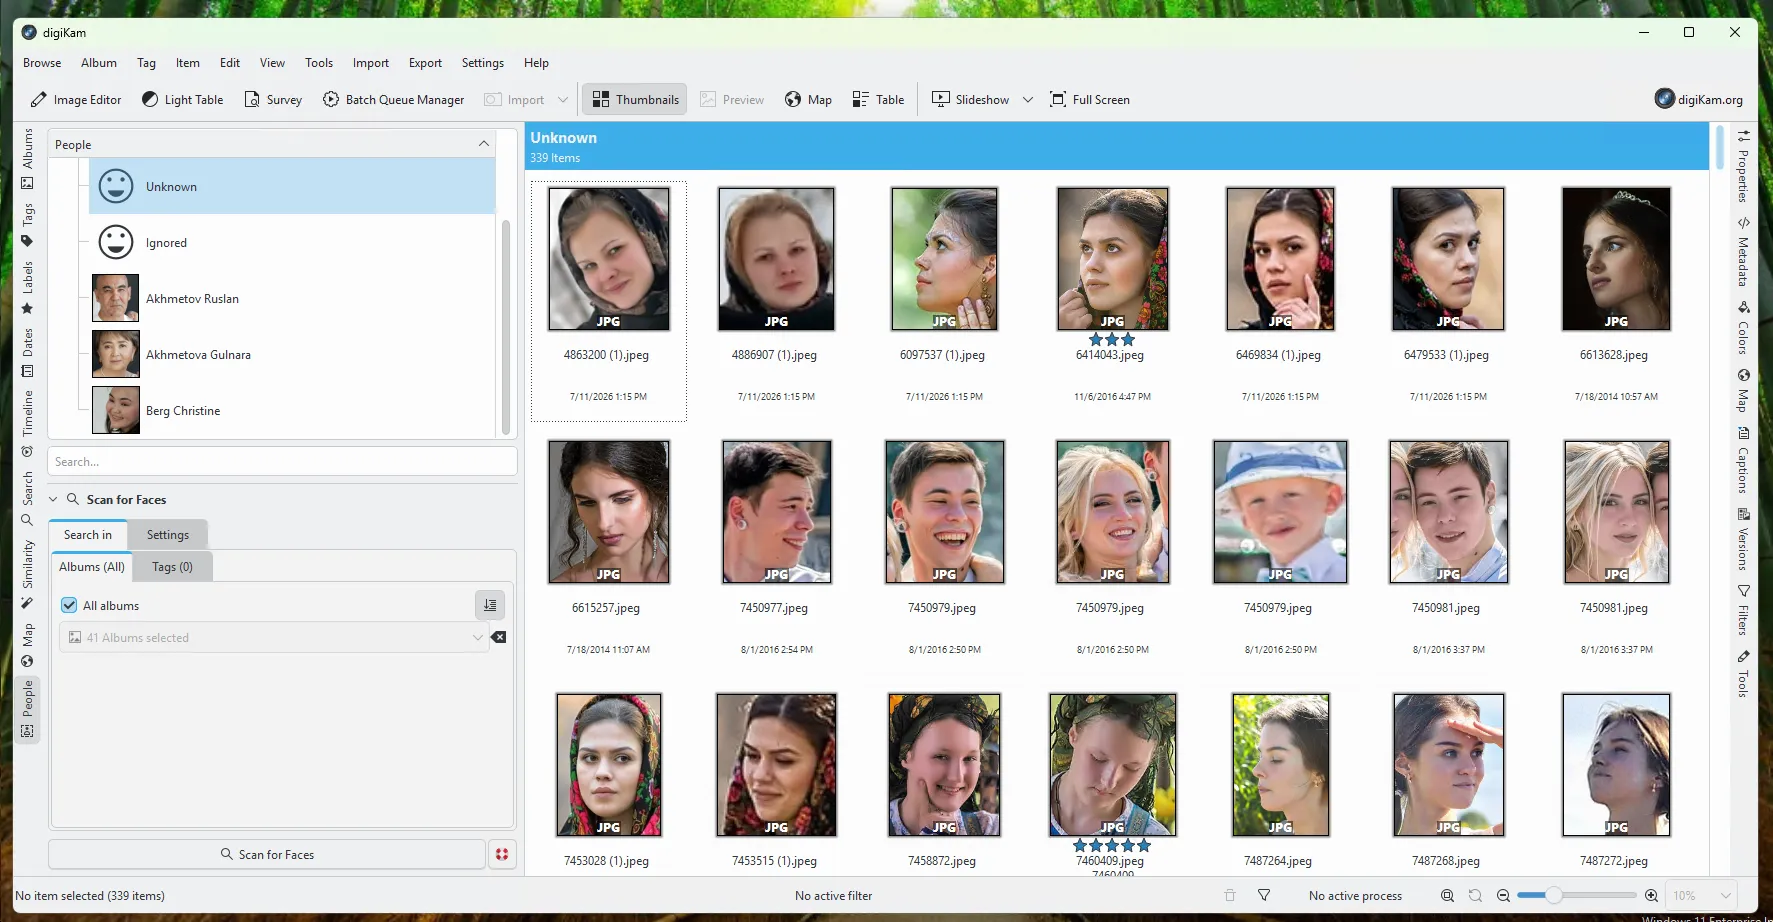
However, once you begin to understand the logic of the interface, it becomes clear that almost any action can be automated here. For this, I created my own photo-processing workflow. First, the program automatically recognized faces, then I checked the results, and after that I added keywords in bulk.
All annotations can be written directly into the photograph or into a separate sidecar file, which is convenient if you are afraid of damaging original RAW files or old JPEG images.
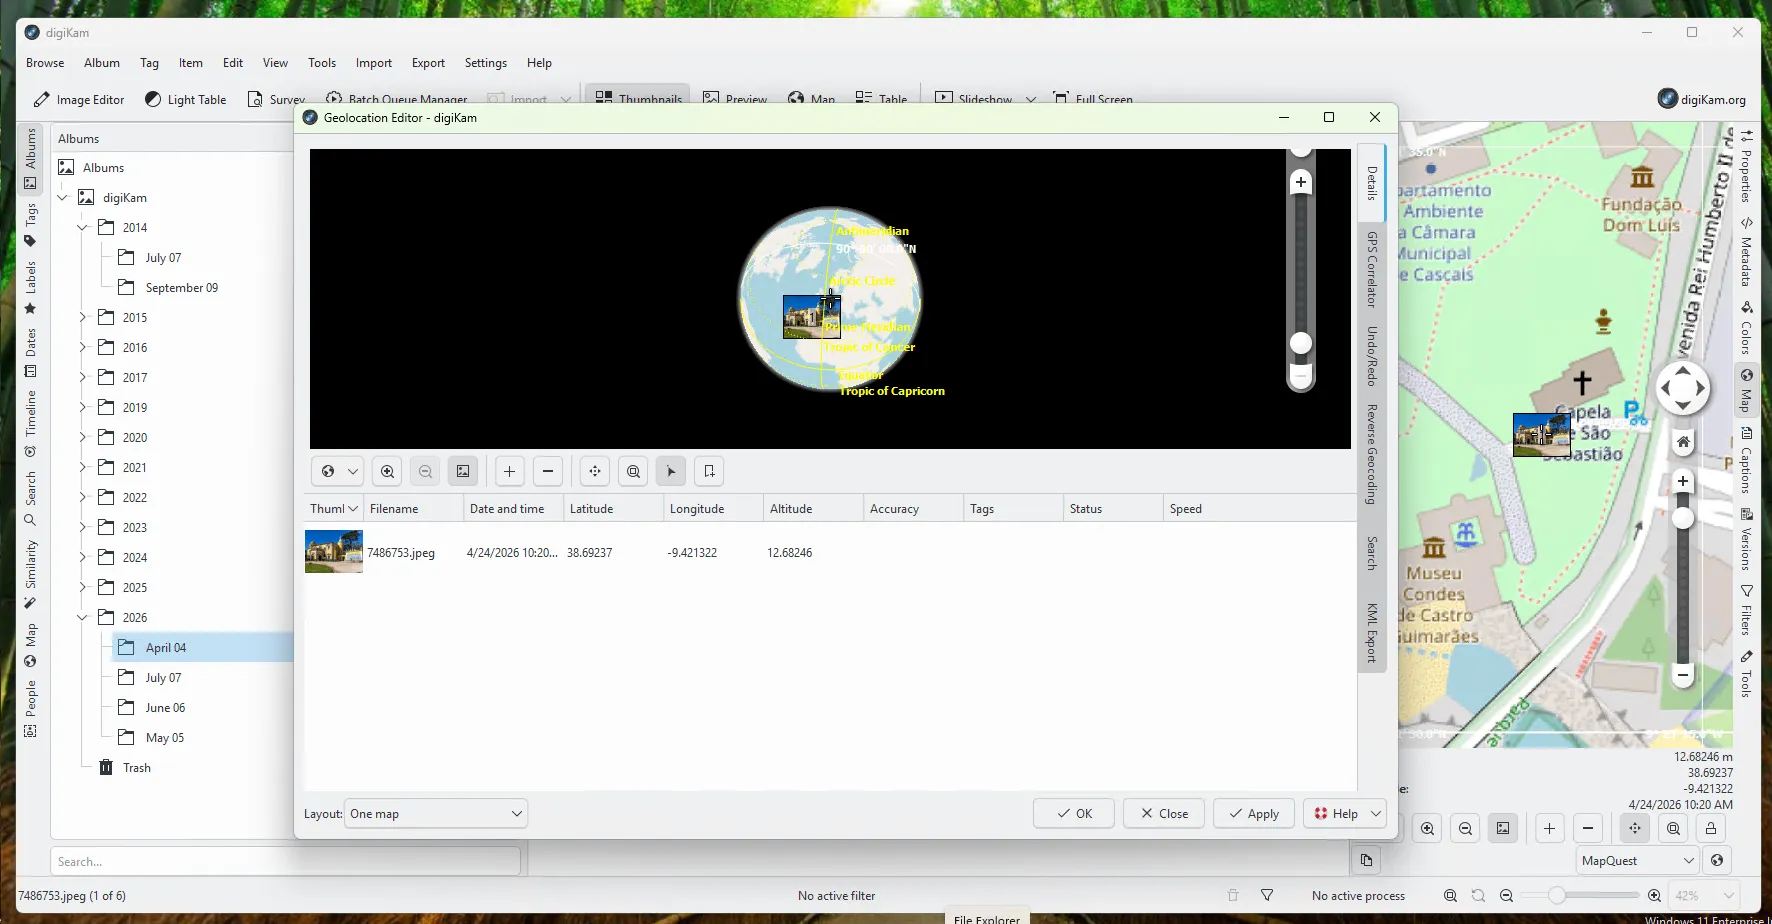
Unlike Photo Supreme with its simple mini-map, digiKam provides a full mapping module. You can even choose an OpenStreetMap or Google Maps base layer.
You can literally drag groups of photos with your mouse onto the desired point on the map, and the program will automatically write precise geographic coordinates into the file metadata.
Advantages of digiKam for Photo Annotation
Completely free open-source software.
Extremely complete metadata support.
Advanced face recognition.
An advanced geolocation editor.
A powerful tagging system.
A high degree of automation.
Cross-platform support.
Independence from cloud services.
Disadvantages of digiKam for Photo Annotation
A difficult interface to learn.
Too many features.
Demanding on computer resources.
XnView MP
As it turned out, XnView MP is primarily an incredibly fast image viewer with built-in cataloging features. But I really liked how fast it works. The program literally “flies,” instantly generates thumbnails, and opens folders with thousands of heavy files without freezing.
At the same time, XnView MP is suitable for photo annotations, but with some reservations. It lacks automatic contextual tagging and automatic tagging based on recognized faces. In addition, face detection is not available “out of the box.”
To add a description of exactly who is shown in a photo, I had to do the following:
Install an additional plugin. First, you need to separately download and install a special face-recognition plugin. Only after that does the necessary panel become available in the menu.
No learning. This plugin uses the simplest possible algorithm. It cannot compare faces with each other, group similar images into stacks, or determine who it is looking at.
Only face presence is detected. The program simply recognizes that a face is present in the frame and automatically draws a frame around it. Therefore, you have to enter the name for each detected person manually in every single photo.
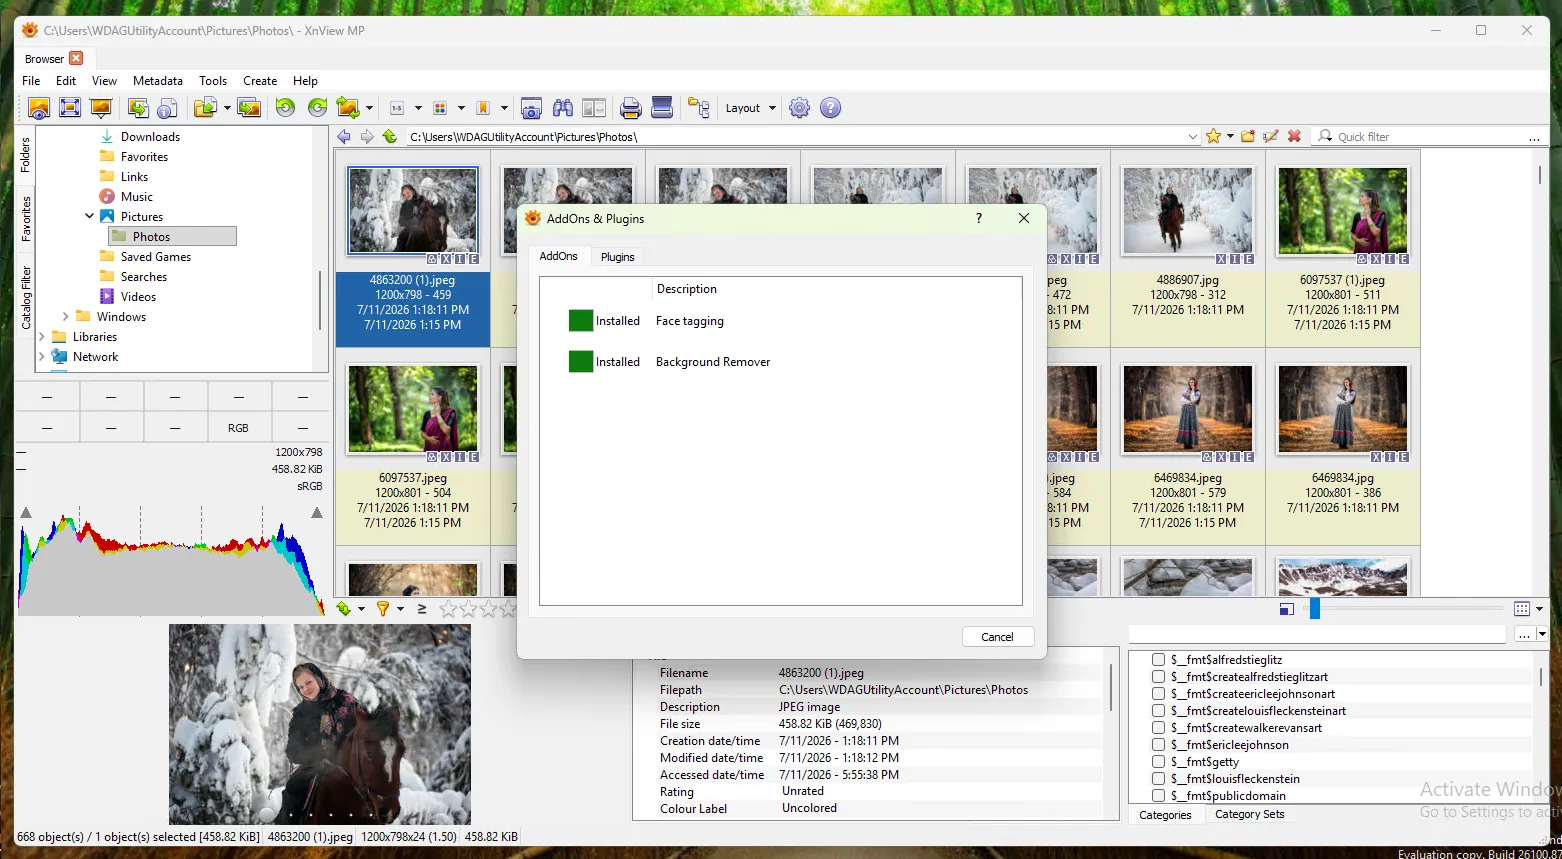
Please note! If your computer runs macOS or a Linux distribution, you will not be able to install the face-recognition plugin.
Remember my story about my grandmother and the router? XnView MP has a built-in drawing tool for such cases. With it, you can place simple graphic annotations directly over an image.
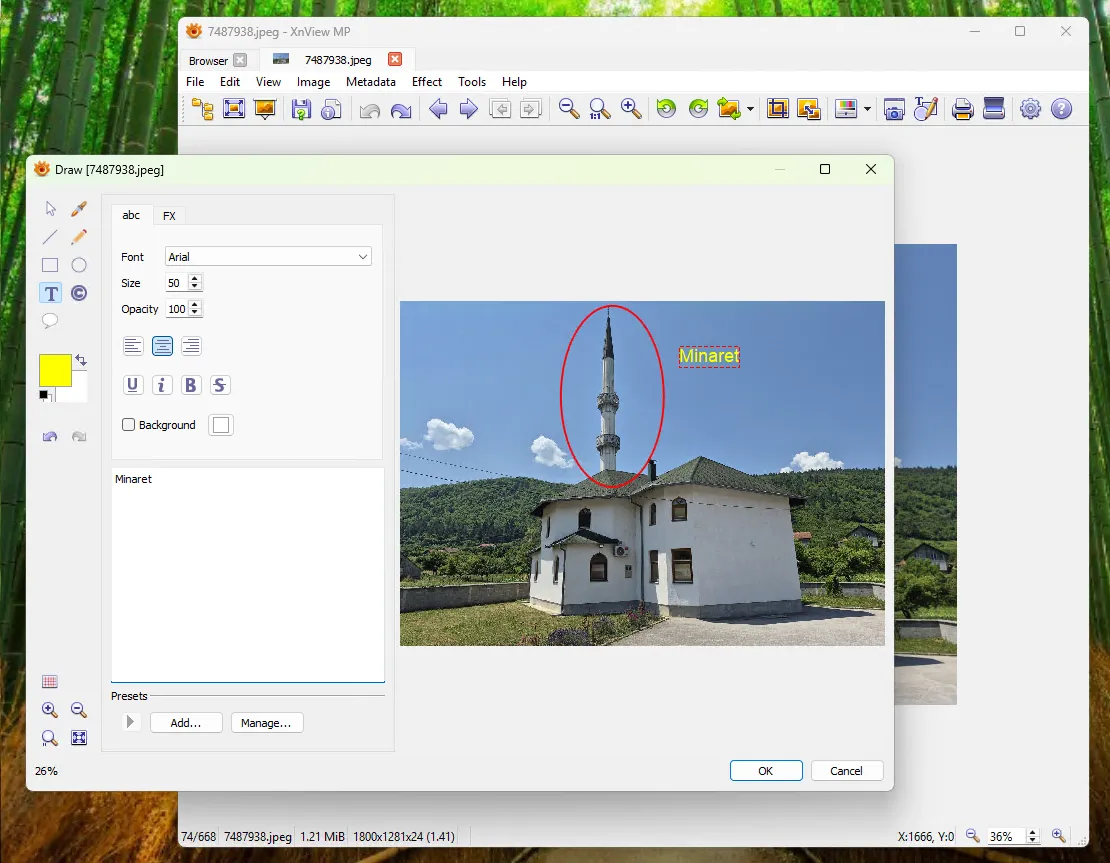
Of course, this is not a full-fledged graphic editor, but its tools are more than enough to quickly make a visual instruction or draw attention to specific details in a photo.
Overall, the program is ideal for situations where you need to add an annotation quickly. For example, if you already have a prepared folder with photos from a trip and need to add keywords, a description, or a note about where a picture was taken within a couple of minutes.
Advantages of XnView MP for Photo Annotation
High operating speed.
Direct writing of metadata into photo files.
A built-in drawing tool.
Batch image processing.
Free use and cross-platform support.
Disadvantages of XnView MP for Photo Annotation
Face-markup setup is complicated.
No automatic tagging.
No AI recognition.
Comparative Analysis of Home Photo Cataloging Systems
To make it easier to choose, I have summarized the key characteristics of all reviewed photo cataloging tools in a clear comparison table.
| Comparison criterion | Tonfotos | Photo Supreme | digiKam | XnView MP |
|---|---|---|---|---|
| License and price | Free basic version / Paid lifetime license | Paid commercial | Free (Open Source) | Free for personal use |
| Writing data into the photo file | Yes | Yes | Yes (or into .xmp sidecar files) | Yes |
| Face recognition (AI) | Automatic (smart grouping) | Automatic (built-in or Google Cloud API) | Automatic (requires local training) | Semi-automatic (face detection only, names entered manually) |
| Person relationships and cards | Yes (family trees, dates, biographies) | No | No (tagging only) | No |
| Work with geomaps | Interactive world map | Simple photo mini-map | Full mapping module | Geotag editor without an interactive map |
| Ease of learning | High | Low | Low | Medium |
Screenshot Tools and Quick Markup Utilities
The programs below are focused on instant screen capture, adding explanatory elements, and quickly sending the result. They are actively used for creating step-by-step guides, recording bugs in personal projects, or quickly marking up maps and plans.
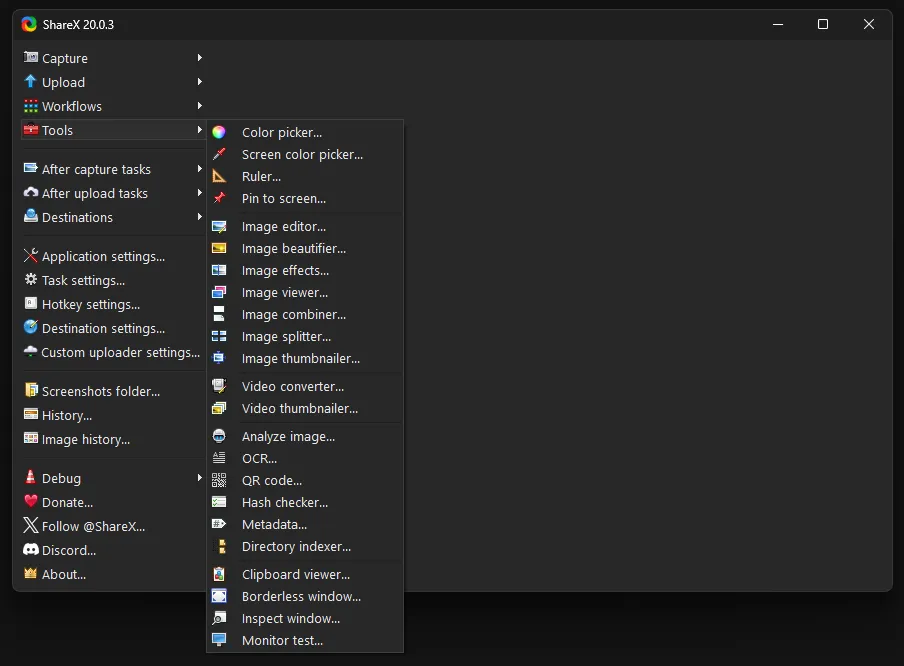
ShareX
At first glance, ShareX seemed to me like an ordinary screenshot tool: take a screenshot, draw an arrow, and save the file. That is exactly how I started using this application instead of the standard Windows Snipping Tool. But quite quickly it turned out that ShareX has other useful features as well.
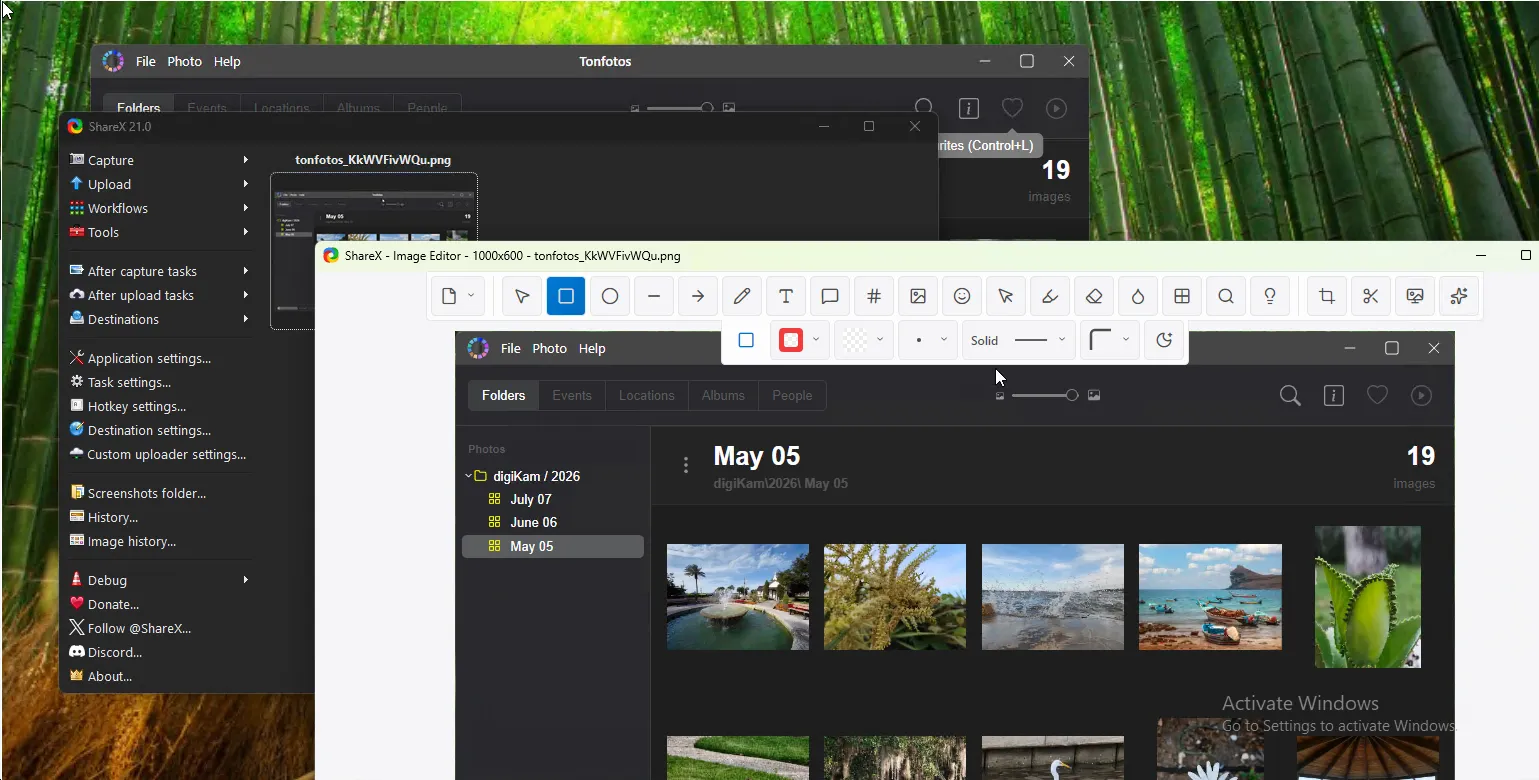
Using the built-in editor, you can open any graphic file: a photograph, an image from a messenger, a map, a diagram, a scanned document, or a picture from the internet. For me, this turned out to be especially useful. When relatives send me a photo of a phone screen with the words “nothing works,” I open that picture in ShareX, draw arrows, label the necessary buttons, and send back a finished instruction.
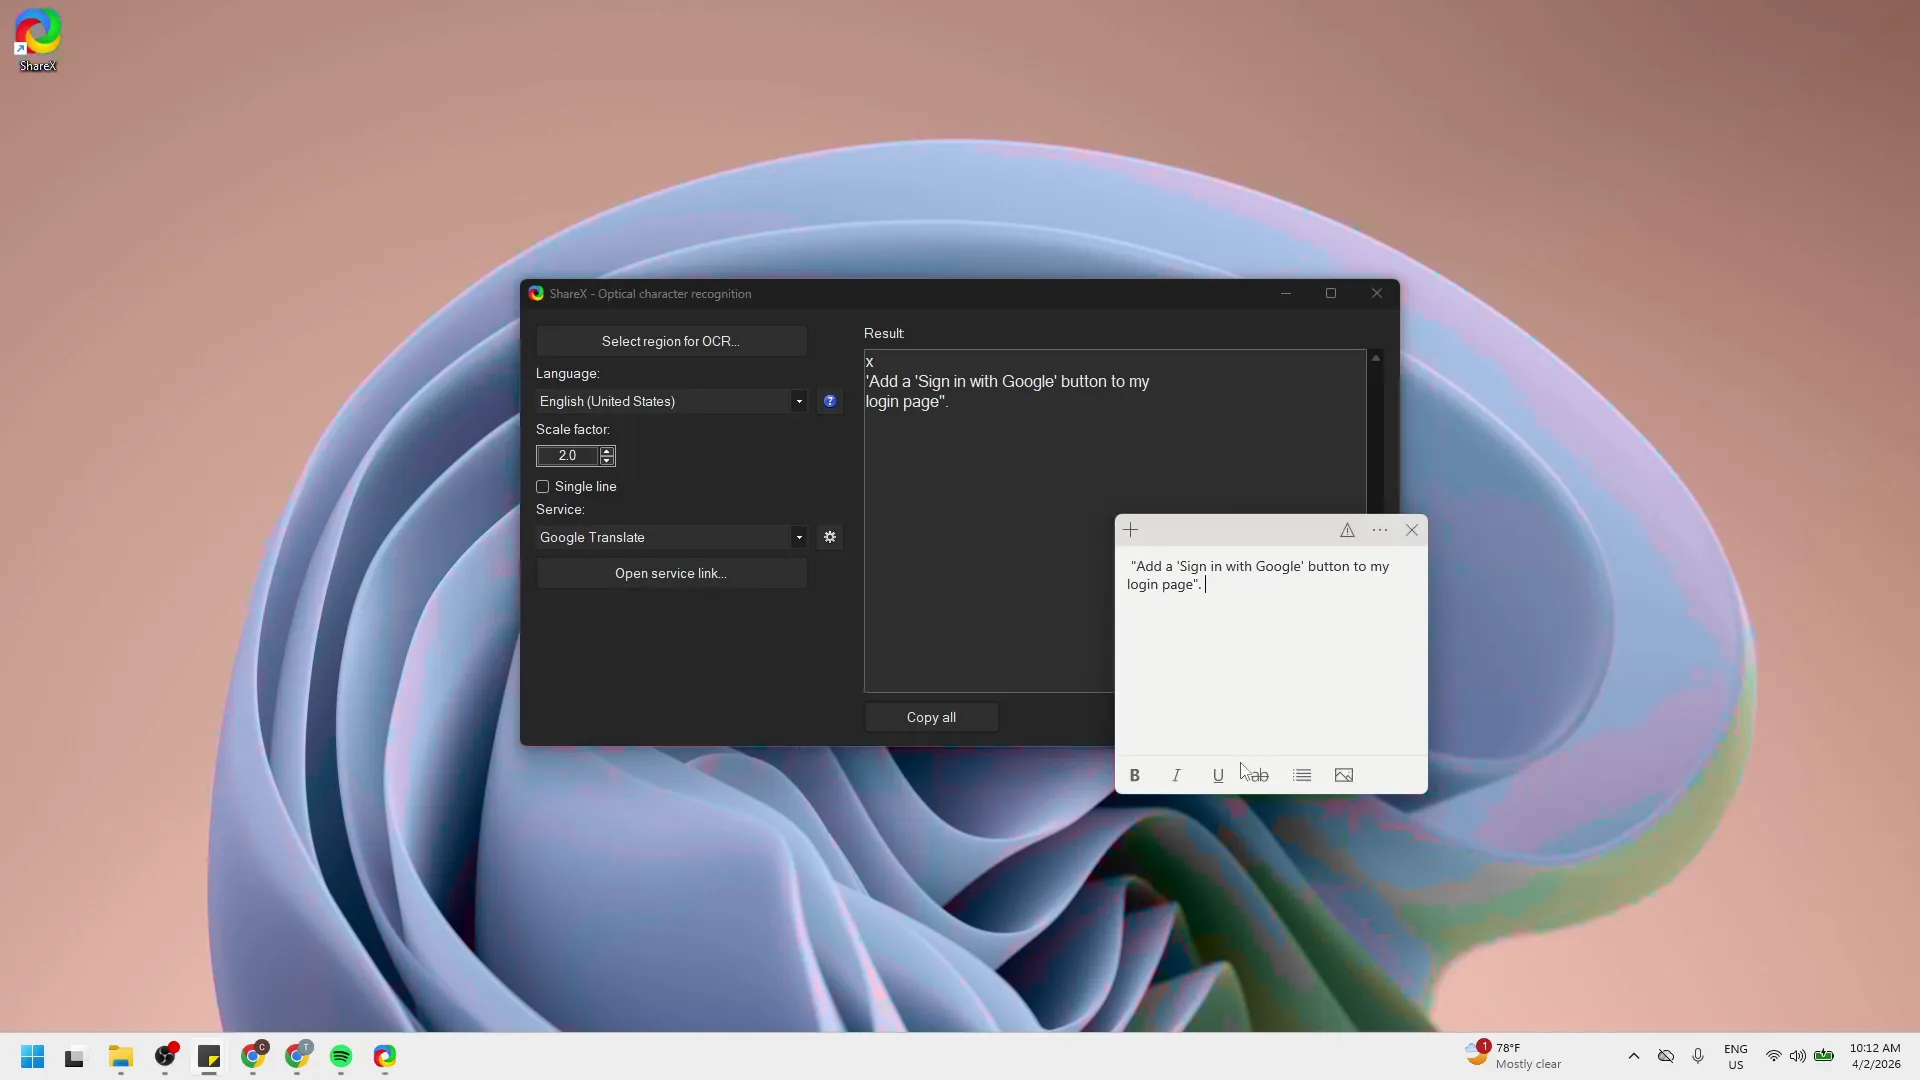
The built-in text recognition feature, OCR, also deserves a separate mention. Sometimes people sent me a photo of an error message on a computer screen. Instead of manually retyping a long message, I selected the area in ShareX and instantly received ready text that I could use to search for a solution online. It may seem like a small thing, but it saves a lot of time.
Because this is a free and open-source application, it suffers from the same problems as digiKam: the interface is overloaded. After launching it, you get the feeling that you are sitting in an airplane cockpit.
Advantages of ShareX for Image Annotation
Completely free and open source.
A powerful built-in annotation editor.
Support for any images, not only screenshots.
A flexible hotkey system.
Automation of post-capture actions.
OCR and text recognition.
Video and GIF recording.
Integration with cloud services.
Disadvantages of ShareX for Image Annotation
A difficult interface for beginners.
A huge number of settings.
Windows only.
Monosnap
If ShareX is a universal screenshot and annotation machine with many features, then Monosnap is a simple, intuitive tool that provides a fast workflow. I would recommend it to people who do not want to spend several evenings studying the program, but simply need to make high-quality screenshots, add clear graphic annotations, and immediately send the result to someone.
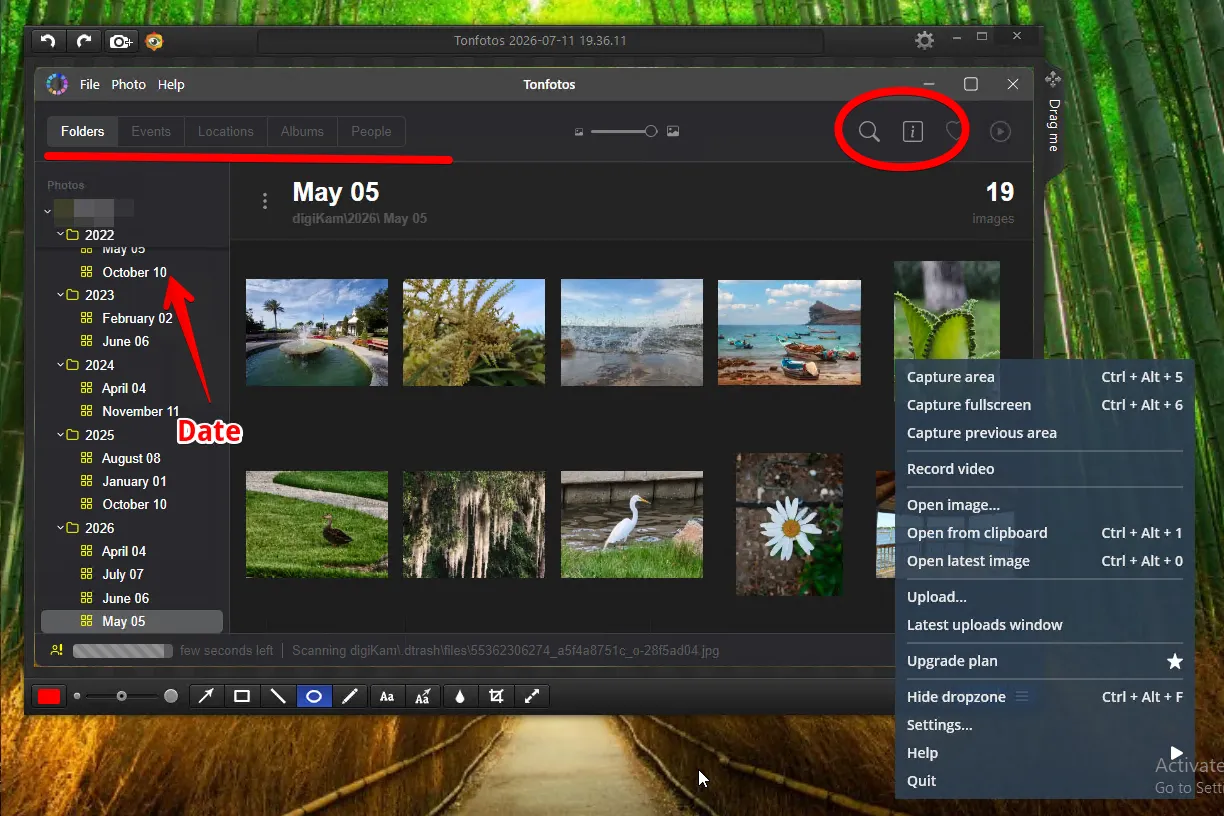
All tools are exactly where you expect them to be, and the interface elements look neat. There is no need to spend a long time choosing line thickness or color. As a result, almost any screenshot can be turned into a full instruction with annotations in under a minute.
I especially liked that the arrows and captions look modern. In some free programs, graphic elements resemble tools from Paint from twenty years ago. Here, everything looks neat even without additional customization.
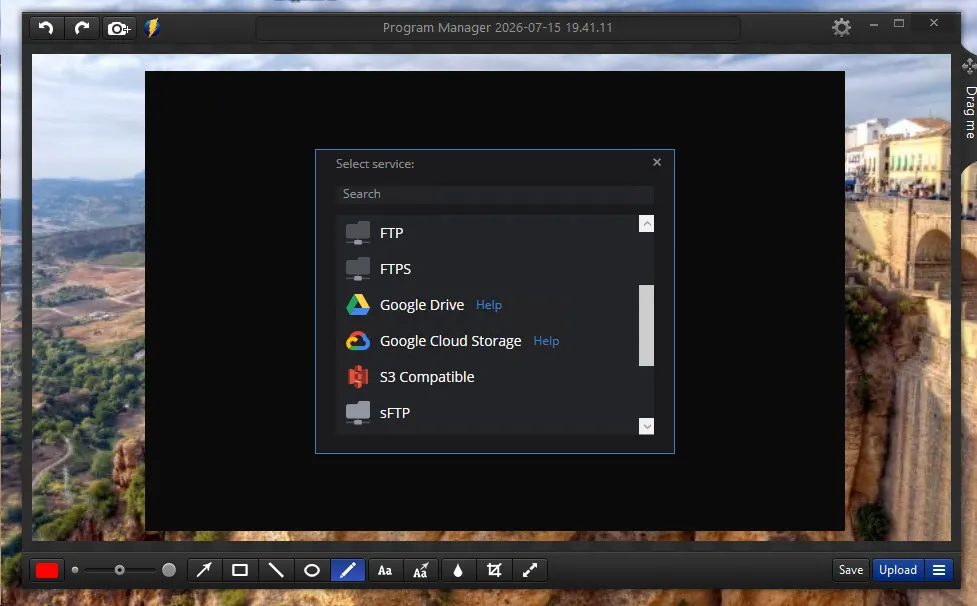
Unlike classic screenshot tools, Monosnap includes its own cloud storage. Thanks to this, after creating a screenshot, you do not need to save the file to your computer, search for it in folders, and then send it separately via messenger or email. You simply upload the image to the cloud, and Monosnap automatically creates a link that can be shared immediately.
If you are not satisfied with the default cloud terms, you can choose a third-party service in the settings.
Advantages of Monosnap for Image Annotation
An intuitive and clean interface.
A modern appearance of annotations.
High operating speed.
Automatic screenshot upload to the cloud.
Disadvantages of Monosnap for Image Annotation
Limitations in the free version.
A modest set of tools for complex guides.
Snagit
If you want not just to add arrows to images for relatives, but are looking for a professional tool for creating detailed guides, Snagit is worth considering. After several weeks of working with it, I understood why it is so often used by technical bloggers, support-team employees, and creators of training courses. While ShareX focuses on having the maximum number of features and Monosnap focuses on simplicity, Snagit focuses on creating genuinely clear and structured instructions.
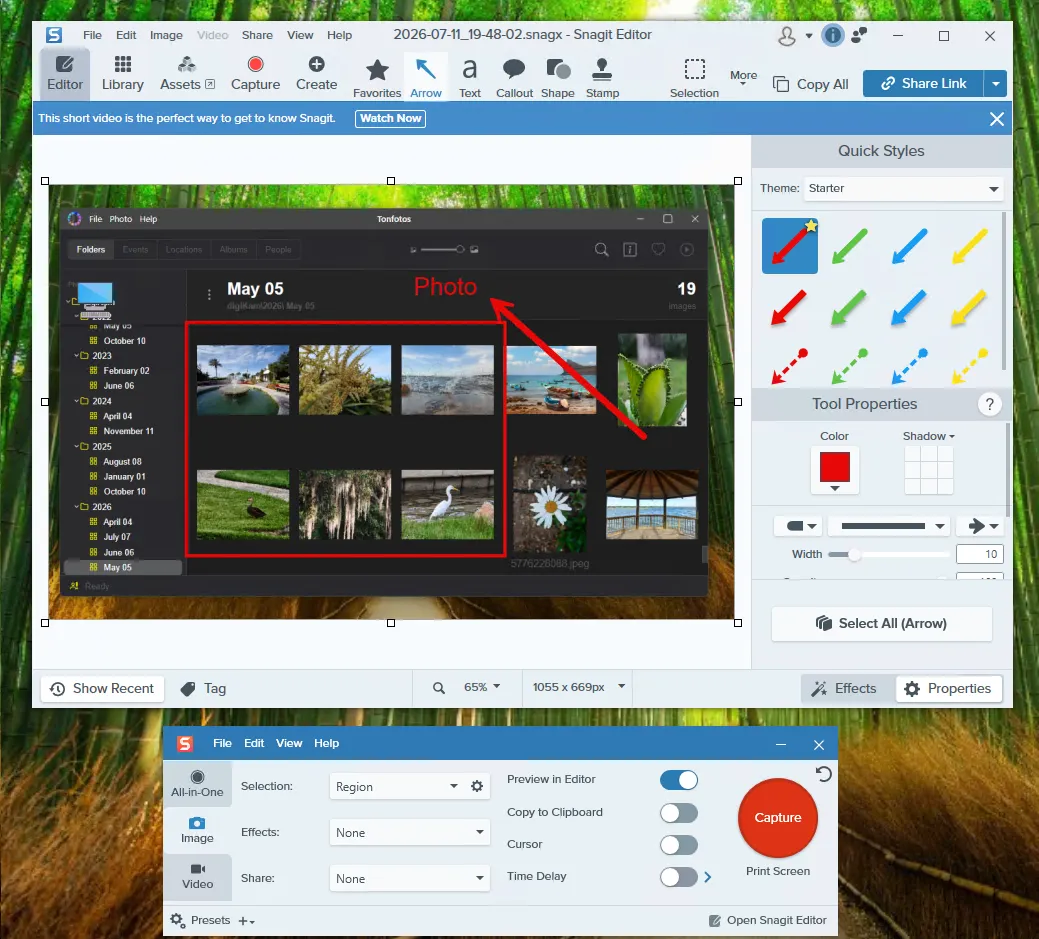
I especially liked the Step Tool feature. Instead of manually drawing circles and numbering steps, you only need to click several times on the necessary interface elements. Snagit will create a step sequence in a consistent visual style by itself. For preparing instructions such as “How to connect a printer,” “How to log in to your account,” or “How to change Wi-Fi settings,” this saves a huge amount of time.
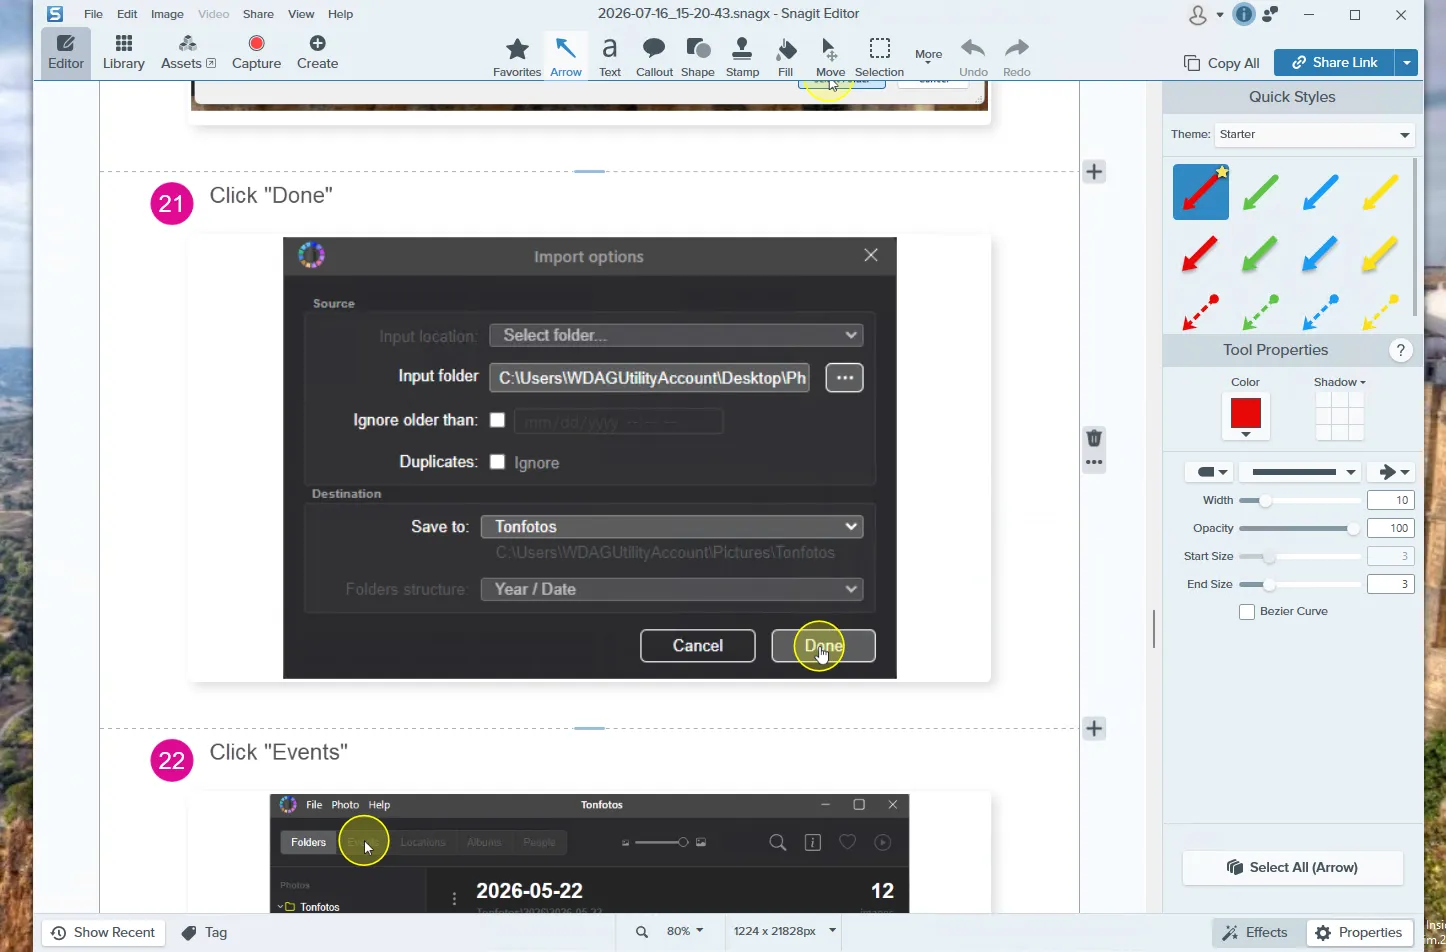
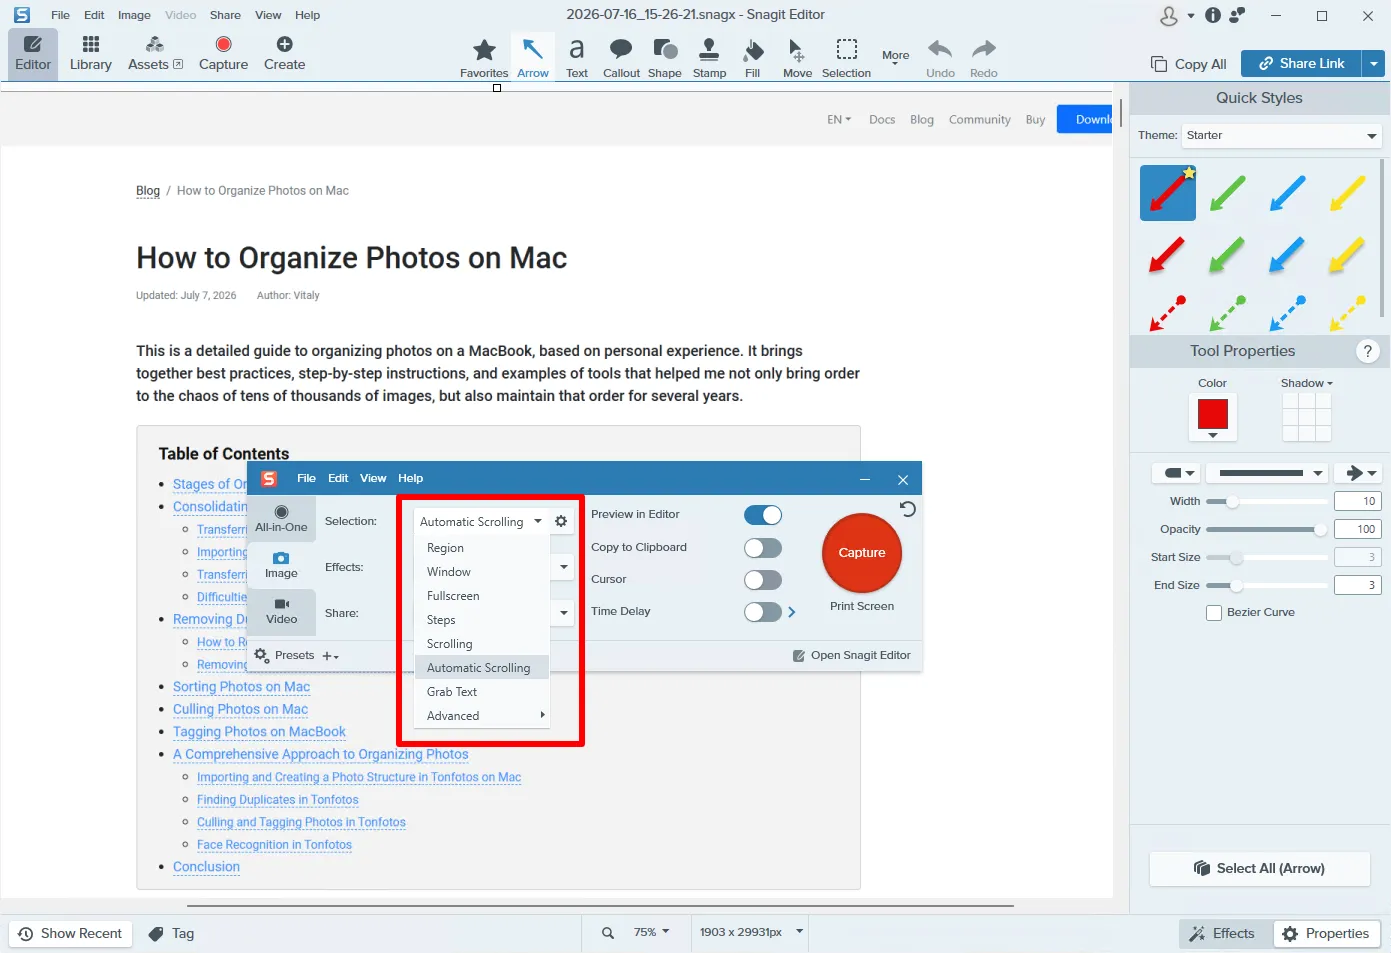
Another strong point of Snagit is working with long pages. While standard Windows tools save only the visible part of the screen, Snagit can automatically capture a scrolling screenshot of an entire webpage, document, or program window. When creating instructions, this eliminates the need to manually stitch several images together.
Of course, this level of convenience comes at a price. Snagit is distributed under a commercial license and costs noticeably more than most competitors. In addition, if you only occasionally need to draw an arrow on a screenshot, its features will be excessive. However, for people who prepare instructions, documentation, training materials, or support replies every day, the time saved quickly compensates for the cost of the program.
Advantages of Snagit for Image Annotation
One of the most convenient graphic-annotation editors.
Automatic step numbering for creating instructions.
A well-designed library of arrows, callouts, and graphic elements.
Capture of long scrolling pages.
Tools for hiding confidential information.
Video recording and creation of training materials.
High-quality visual design without lengthy setup.
Disadvantages of Snagit for Image Annotation
Paid license.
Too many features for simple tasks.
Limited photo-cataloging capabilities compared with specialized managers.
Not suitable for organizing large photo archives or working with metadata.
Comparative Analysis of Screenshot Tools and Quick Markup Utilities
As with photo managers, I have collected the key parameters of the applications in a summary table.
| Comparison criterion | ShareX | Monosnap | Snagit |
|---|---|---|---|
| Operating system | Windows only | Windows, macOS | Windows, macOS |
| License type | Free (Open Source) | Freemium (limitations in the free version) | Paid commercial |
| Interface complexity | High | Minimal | Medium |
| Annotation graphic quality | Medium | High | Excellent |
| Cloud integration | Yes | Yes | Yes |
| Unique features | Text recognition (OCR), GIF recording, automatic actions | One-click quick link, integration with corporate storage | Automatic step numbering (Step Tool), long-page scrolling capture, data blurring |
| Use case | Quick capture and technical automation | Daily “on the fly” screenshot exchange | Creating professional guides, instructions, and knowledge bases |
Conclusion
There is no universal tool for image annotation. It all depends on the tasks you need to solve. If you need to organize a home photo archive while preserving metadata and making photos easy to search, you should look at specialized photo managers. If your main goal is to quickly prepare a clear instruction, mark important elements on a screenshot, or share a visual explanation, it is much more convenient to use screenshot and markup programs.
When choosing a tool, pay attention not only to the number of features, but also to where the program stores annotations. Solutions that write information directly into file metadata allow you to preserve the results of your work when moving an archive to another computer or switching to another ecosystem.
Remember that image annotation is not just adding arrows, captions, or tags. It is a way to make visual information understandable, easy to search, and useful years later.
Frequently Asked Questions (FAQ)
What is image annotation in simple terms?
Image annotation is the process of adding explanatory information to graphic files. This can include visual elements, such as arrows, frames, and text over a screenshot, as well as hidden text metadata, such as names of people in photos, keywords, geotags, and dates, which are written into the file according to EXIF, IPTC, and XMP standards.
Which program is best for creating step-by-step instructions?
For creating professional guides and training materials, Snagit is the ideal choice. Its Step Tool allows you to automatically number steps with mouse clicks, and its scrolling-capture feature helps you seamlessly capture long webpages.
How can I automatically recognize faces in photos on a home PC without uploading them to the cloud?
To preserve privacy, use programs with built-in local neural networks that work without the internet. Tonfotos has the most user-friendly interface for this task. digiKam is suitable for open-source enthusiasts, but it requires careful study of the documentation to configure the recognition algorithms accurately.